Welcome to Marauder Moments - a chronicle of the Mortimer Street Marauders; the games we play, the rules we use, the figures we play with and the scenery they fight over. Hope you enjoy these pages and maybe call back to catch up with our escapades.

Tuesday 30 July 2019

The Battle of Danes Crossing - ECW Summer break

The Battle of Danes Crossing, Wiltshire, early 1640's.

This isn't really a batrep more a few pictures of Tony Lasughton's every growing & splendid ECW collection. Every Summer we get kicked out of Marauder HQ for a week so we're homeless Marauders! Luckily Tony has a gaming room at home so he kindly invited along to cross swords at his place. 

Looking along the board diagonally. Loads of pretty 28mm models & scenery - right up my street. 

This is me this evening - call me Willmott!
These I suspect are Foundry veterans painted by Tony.

Rules in use were Black Powder & the Pike & Shotte supplement.
This looks like Talbot's foote resplendent in yellow. 

Thomas Aston's foote.

The Royalist centre up on the high ground near the aptly named Three Birch Copse.  

The Royalist left was blessed with the presence of Prince Rupert & his cavalry wing.
Chris commanded these against Tony Laughton our host. 

Tony L's wing opposite Chris with Prince Rupert.
That graveyard wants filling...

The Royalist extreme right featured this ever so cute thatched cottage & veggie patch.
Behind are Tony D's dragoons & commanded shotte.

The rebel Parliamentarian centre launches a mounted attack with heavy cavalry after an opening artillery barrage.
On an amusing note two rebel miltia regiments of foote turned tail & quit upon seeing the Kings array under Wilmott - Me. 

Danes Crossing is a village in West Wiltshire named after the crossings made by Vikings near Chippenham. There are two bridges across the River Avon here making it a vital crossing point for the Kings army, specifically the heavy artillery & siege train bound for Lansdown near Bath & Bristol. 

Chris leads his cavalry & foote aggressively forwards.

My own regiments of horse proved no match for Parliament's heavies despite several charges.  
'
This lovely regiment of Cuirassiers held up my entire battalia without either side really hurting each other!

Chris's foote exert pressure on Danes Crossing although Tony L has gotten a regiment in lavender onto the stone bridge first.
They won't last...

Willmott issues orders in plane olde engkish - the siege train & hif perfonal shotte get hopeleffly tangled in a blunder order!
This knotte ifn't undone in time for either to fire a shotte all evening! 

Our ever gracious host was cruelly bundled back by Prince Rupert aka Chris. His entire mounted wing was dispersed followed by much of his foote! Tony/Essex released his body guard horse to prevent a breakthrough...
No chance! Paff - gone in a puff of smoke!   

"No sign of any rebels here m' Lord". 

Light gun & crew - A pretty piece. 

Parliamentary Cuirsssiers - a tough nut to crack. 
Close up of a Regiment of Foote, pike block & two sleeves of shotte.


Essex, the commander for Parliament today takes a moment for the war correspondent's camera as the sun sets before he fucks off home! Don't come back or we'll throw your worthless skin to the dogs.    

Prince Rupert with escort & Boy.
What a fine chappy he is, tonight he will feast on Wiltshire ham, egg & chips washed down with golden cider from the orchards of God's own county. 
With the sun setting on Danes Crossing the Rebels quit the field after a sound thrashing.
Loads of fun was had by all, definitely something to return to again & again.
Many thanks to Tony our host and to Chris & Tony for being such splendid fellows too!

Best wishes one & all,

Jeremy


We had wrapped up early so I dropped these two home, here they are enjoying a night cap at Chris's new gaff.
Sleep well Gents, Zzzzz.   


Shadow of the Wolf part 3 - conclusion & reflections.

The third full gaming session saw a conclusion to the battle. Both sides still had uncommitted troops  but both also had formations which were teetering on collapse - bled dry from nearly a whole days combat. At this stage it was obvious that my Austrians had failed to make their numerical superiority count. Chris's French meanwhile had a played a shrewd waiting game; careful use of reserves, patient battle management & the clever withdrawal of spent units or batteries prevented severe disruption & a command & control headache; Bravo monsieur!

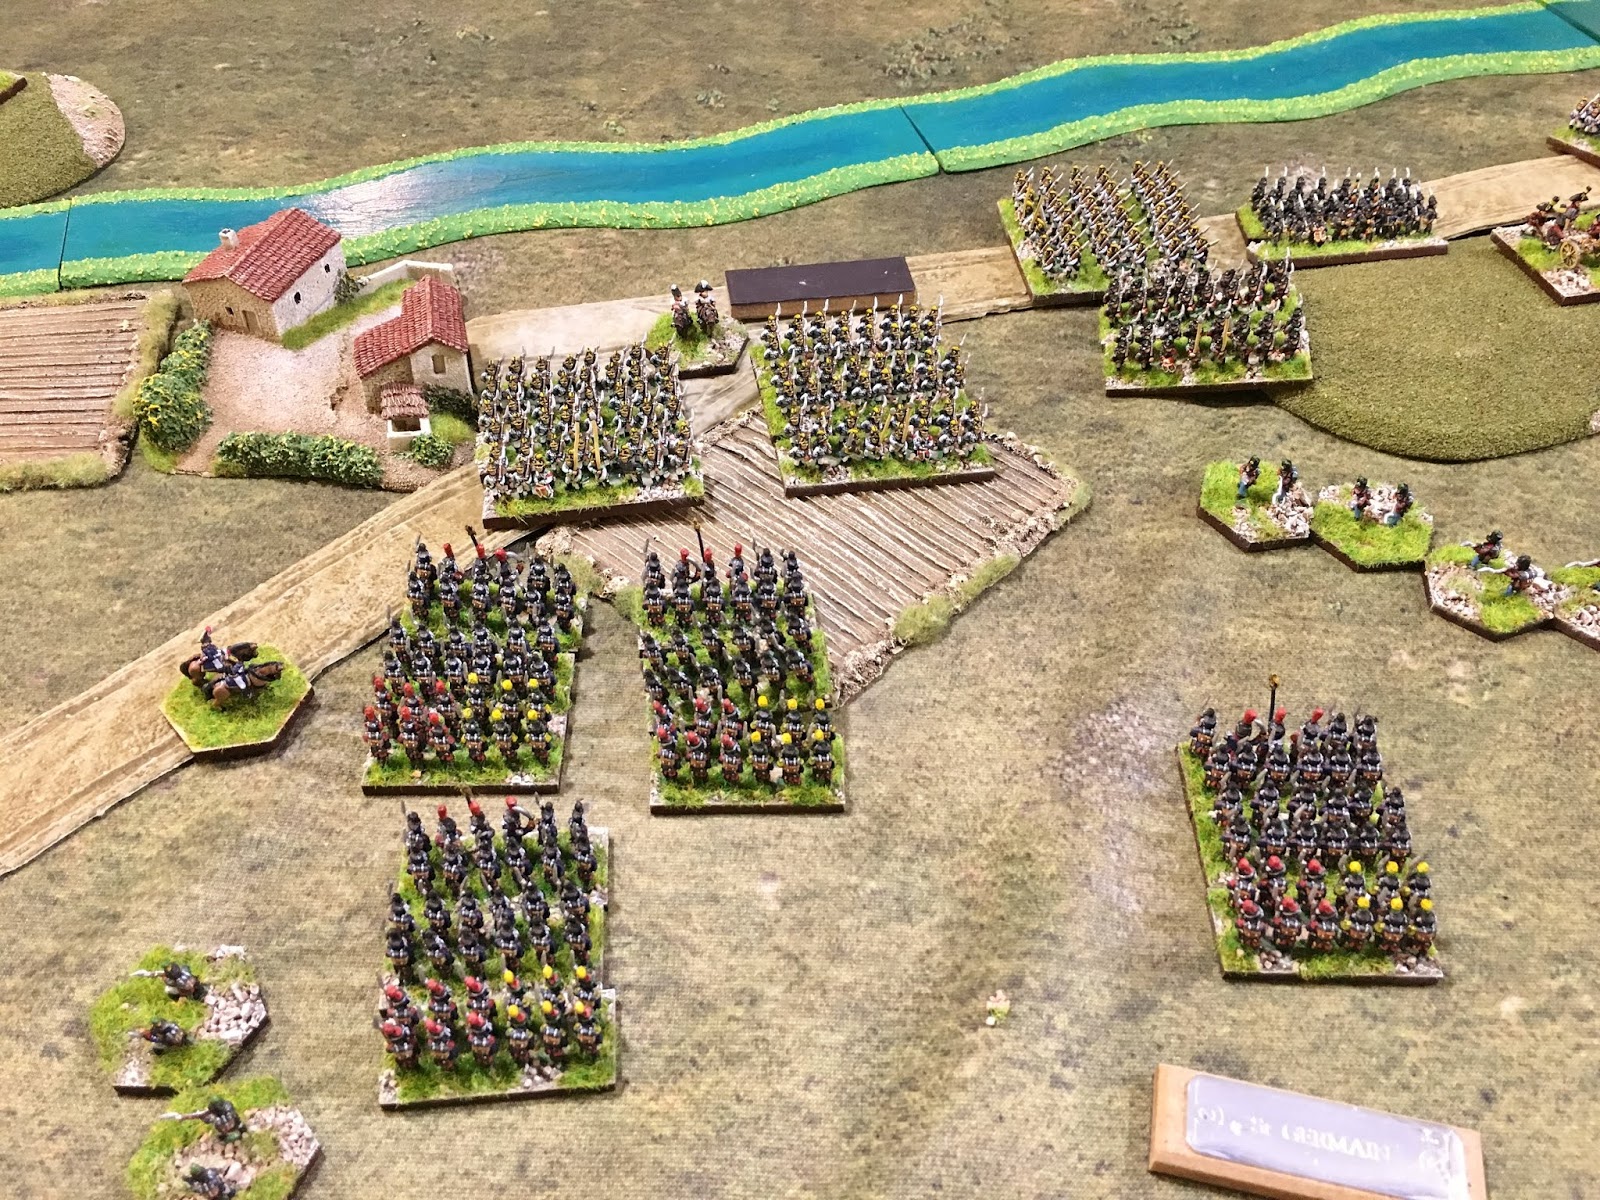
The Austrian left has thrown back Friant's French but it's taken two to one odds to achieve and not without significant cost.
The threat of the French heavy cavalry on the flank here never materialised - thankfully! They stayed hesitant or failed to close with squares & their horse battery were kept occupied with taking pot shots at the Austrian light horse to the French extreme right off screen.  

The centre gets fruity - finally!

The Austrian attack on the right was frankly bungled by me - the mess was entirely of my own making! 
Way back in the initial turns I ran away with two light cavalry brigades which without horse artillery had no chance of breaking formed French infantry with artillery support. Infact the reverse happened as the French brought up heavy cavalry with additional horse artillery. The Austrian horse lost this encounter badly and spent much of the day trying to reform and extricate themselves from hopeless entanglement with friendly infantry & artillery attempting to mount an attack.
This proved to be the saving grace of the French left.          

Towards the evening French heavies charge down Austrians in line...

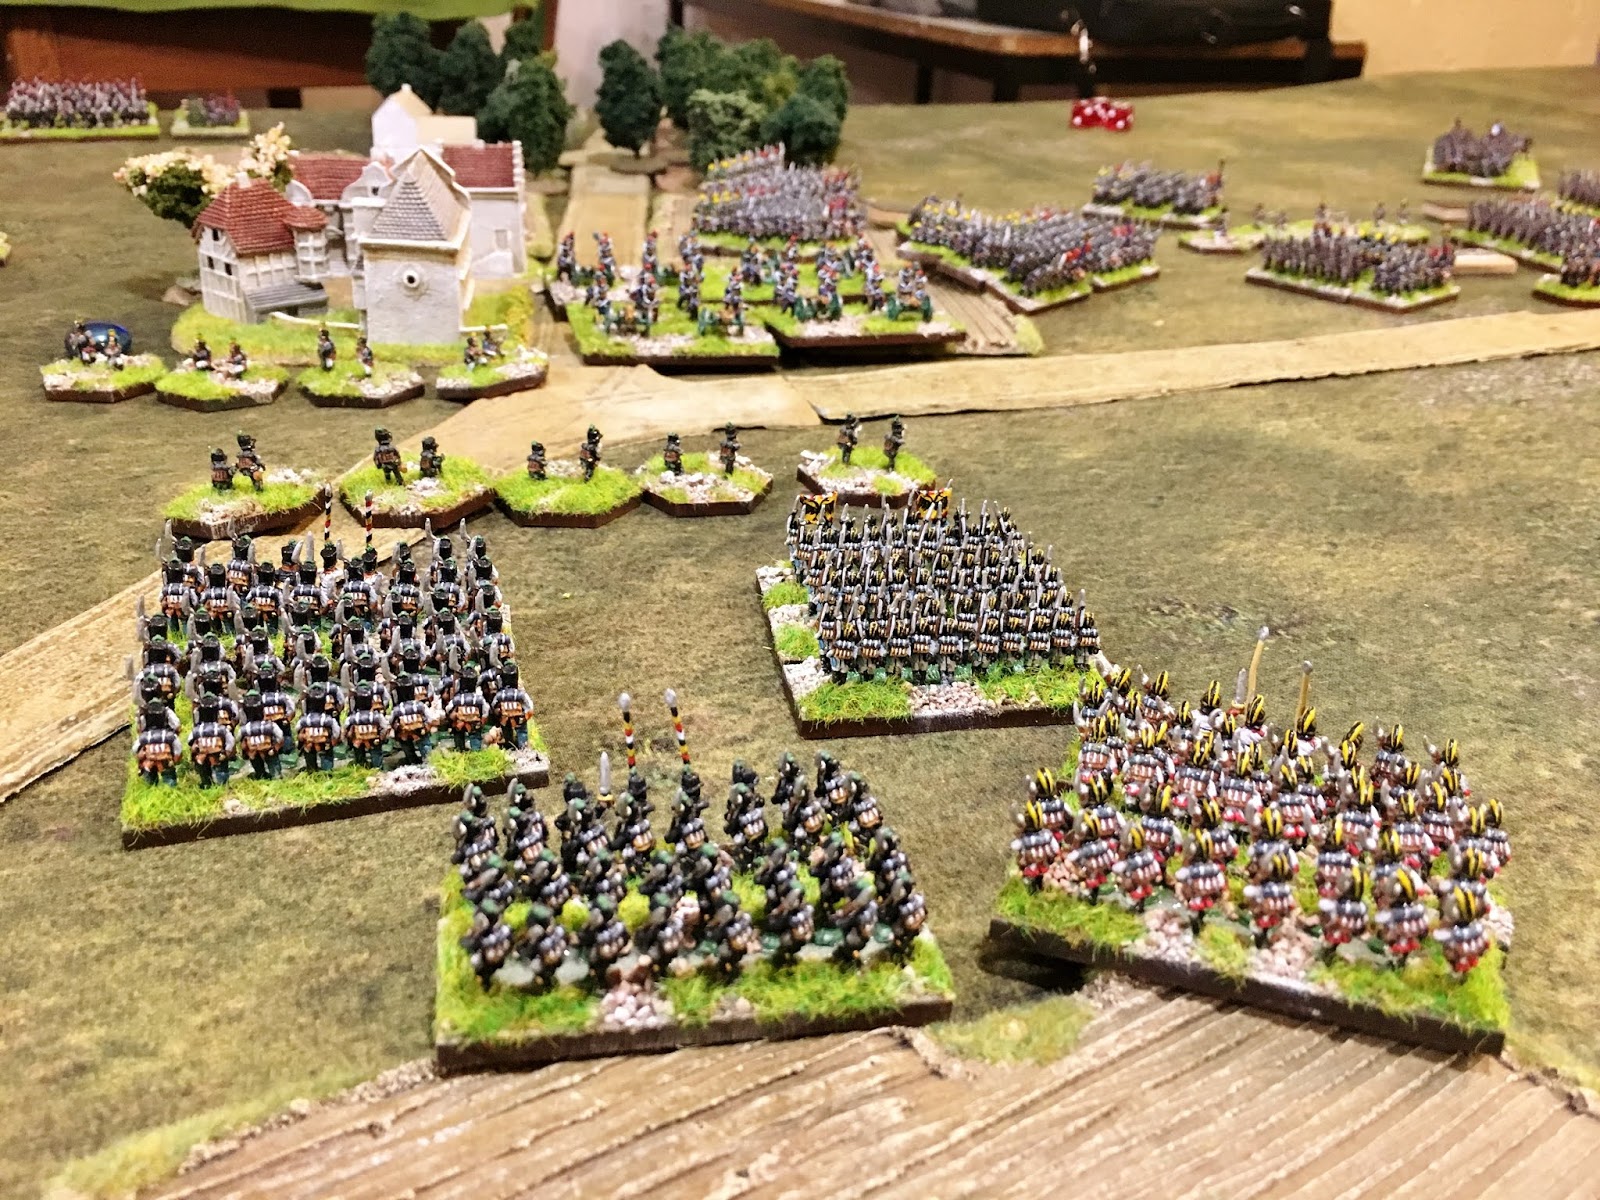
French Old Guard Polish lancers threaten the Austrian centre. 

French Old Guard Grenadiers a Cheval looking resplendent! 

The Austrian centre left approaches Wurtemberg lines having driven off their battery.  

Late in the day the French mount an attack on this junction which Horn has been sat on all day. French infantry with Guard cavalry & Grand Battery support line up an assault.  

Grenadiers with 12lb foot battery finally insert into Austrian battle line. The front lines have failed to take the junction by the village.

The view from the French lines of the above picture.

French attack columns going in against Horn on the river line.

Fresh French troops move up from reserve to stabilise Friant's flank against spent Austrian troops. this intervention saved the French right from possible destruction. 

Austrian infantry brigade crossing open ground to assault the Wurtemberger's position.

Horn's foot battery on a low ridge provides counter battery fire against the French massed guns.  

Horn's junction in peril.

Nearing the Wurtmeberg lines - ever so slowly...

Austrian Grenadiers with 12lb battery from the reserve move up to support the attack on the French centre.  

Horn's position in the Austrian centre under pressure.
French OG cavalry support the line battalions.  

This signalled the end of hope on the Austrian right - French Carabiniers breakthrough & move to encircle the Austrian position - Oh deary me!

Also on the Austrian left the opposing French brigade with fairly fresh battalions chooses this point to attack. 

Panning out from above - don't forget the French heavy cavalry behind the Austrian position off screen right! 

French troops clear the area of the junction and claim the objective for themselves having forced an Austrian withdrawal under the protection of a Grenadier brigade with 12lb guns.
A good days work - Tidy!
French Victory in the Shadow of Wolf Tower. 

Reflections on the Battle as a battle. 

We called it here. The French had wrestled control of more objectives with less troops, inflicted more casualties & maintained a more powerful reserve in the face of a larger Austrian army. Well played Chris.

So where did Tony & I go wrong? The truth is that Tony did nothing wrong at all. He obeyed my orders perfectly; he attacked where I asked, held where I wished & exercised great restraint when tempted to do otherwise - Bravo Monsieur Tony!

The burden of command lies with my decisions solely. How about the plan? Well, holding the central two objectives was sound enough and attacking the right hand two was essential to secure a win. Here is where the "small minded player in me gets in the way of the BIG picture want to be Marshall". Tony & I were playing Austrians so I split the army roughly evenly along the board & split it between us - fair enough? No! I then ordered Tony to attack on the left against meagre French forces holding no objectives at all - completely pointless, almost criminally negligent! But it gave him something go for, maybe he could wrap it up and sweep around to the - also devoid of objectives mind! Holding the centre was sensible enough. My attack on the right was under whelming for two reasons; firstly I didn't allocate enough resources to it, secondly I ran away with the light cavalry & got them mangled, these in turn severely disrupted the infantry attack. The unnecessary death of Meyer robbed the Army of ADC's too. The GDA rules are correctly tough on Austrian commanders in this period & generous to the French so any ADC loss was painful! This had an impact on my attempts to release reserves to support my attacks & saw my heavy cavalry reserve sit stoically all day - Hopeless! 

Other details eluded me. Chris deployed his French mostly two brigades deep - I didn't & I should have done, Doh! Chris deployed a Grand Battery by pulling batteries away from various formations; once again I had this option, specifically the two 12lb batteries attached to Grenadiers in reserve - these would have out ranged the French guns & should have softened up a few choice targets before my attacks went in.

Reflections on the Battle as a game.

From a game-play perspective this game had everything so can be classed a great success. Like all of our games the sides are never equal, the terrain not equal and conditions of victory variable. 
It looked the part for me. The scenery is coming together as a coherent entity. The armies since basing and moving over a more convincing landscape look the part. These are beginning to look like the pictures & maps you see in dusty reference books - that pleases me immensely :) 

We have more formations on the way and a pile of new hills and more villages etc too. This can only get more Epic than ever. 

Parting shot...   

Chris & I had a long discussion about this game on the day of Attack, sadly neither Tony could be there.
One of us suggested that we play these games to a full conclusion. 
Rather like the most satisfactory sexual intercourse, we all know how it ends but the "vinegar strokes" still have to be played out for the finale! 
In game terms this means letting the reserves run wild, let's see the Guard attack, lets see a command disintegrate, let's feel the consequences - "The agony & the ecstasy".
This is a worthy goal and easily achieved so we'll try it.         

There we have it. I really hope you enjoyed this game. Feel free to comment & follow if you haven't.
Writing this had revealed that I am maybe a tad rusty at these so will attempt to do better next time.

Best wishes,

Jeremy   


Monday 15 July 2019

Shadow of the Wolf - Part 2

We returned to the second & third session last week. The lines had not really come to grips yet, this  has been a game of maneuver so far, but all that's about to change. People are going to die & young Clemency Wolf's curse on the valley will reap a strong harvest.

Rules in use are General d'Armee, Austrians & French in 1809. Table 14'6 x 6, back boards not in use. Deployment was interesting; Deep reserves on the table edge, engaged formations up to 12" on, Light cavalry, skirmishers & artillery up to 24" on - it worked. 

This is an over view looking roughly south east from the French extreme right.
In the fore ground two Austrian brigades converge on Friant, in turn a French heavy cavalry brigade is moving to secure the right flank & spoil the Austrians ability to exploit their superior numbers. The horse battery seals the flank of the heavies from Austrian light horse of screen to the right. This area will see an eruption of violence soon enough...      

Meanwhile back on the Austrian right their initial numerical advantage has been skilfully overcome by the French.
The rough handing of Von Hammer & Mayer's light cavalry brigades by French artillery & Cuirassiers has caused a mess here. Retreating hussars, uhlans & chevau legere has disrupted Von Riess attack stalling it and the deployment of supporting batteries. Time to rebuild & attack - all the while under fire from three French batteries.   
French Cuirassiers returning to their lines to rest their horses & wipe their sabres.  

To the left of the above scene Austrian attack columns near their target. The French pull off a difficult trick here; pulling a depleted battery out of the line & inserting a fresh one. Skirmishers trade shots & insults.   

Le Grande Batterie in the French centre has not really delivered yet. It has however controlled the ground as the Austrians are yet to venture into the killing field in dominates - Area denial.   

The Austrian centre left now has the support of a brigade of Grenadiers with a 12lb battery & begins to deploy for an attack. 

Old Glory French horse battery on the French right.
Get those plumes!

French Cuirassiers on the French right.

More French Cuirassiers on the Right.

Nice close up of Austrian line battalion.
We still need to get flags for both armies - sounds like a few tiresome evenings work.

Friant takes a minute to pose for the camera - "Bonjour Monsieur".   

Wurtemburg brigade in the centre - so far not engaged. Note hand painted flags by Tony.
The block of wood is worth a comment at this point - these are attractive accessories with an engraved name plate showing the general's name for ease. When flipped over like this it means the brigade is "hesitant" for this turn.
We think it's rather elegant system.   

French Old Guard Chasseurs a Pied, 40 strong!
One of four such battalions in deep reserve. 

Another French general posing for the camera - not sure who this time.

French Carabiniers regrouping behind the lines on the French left after defeating the Austrian light cavalry.  

Pretty regiment of French hussars behind the French left, we have another three regiments of French hussars to be painted.

French Voltigeurs screening the village on the vital junction.

Panning out from the shot above as the lines close.
Note the recycled battery now in the rear resting.  

Panning out further still to behind the supporting Austrian battery dropping long range round shot on the Frenchies! 

Von Hammer & Von Reiss disentangling their mess before mounting an attack.

Horn's brigade is strung out between two objective junctions along this the road. They are mostly sheltered from massed enemy artillery by a long low hill.

Austrian battery from Horn's brigade up on the low hill bravely trading shots with the French Grand battery.
Grenz skirmishers to the fore.

Austrian battalion supporting a foot battery.

Nice shot of the abbey as the Austrian left makes contact with Friant's French.
Smoke indicates a firefight has erupted.  

Ruinous artillery fire drove off this lead Austrian battalion which retreated with heavy casualties. 

Friant's French boys in line await the Austrian onslaught.

Grenzers take well aimed shots at French lines & artillery crews, but not without losses.
A white marker indicates 1 casualty, a blue one 2 casualties, a 3rd and a base is removed. 

This is a beautiful model - more to follow as we speak!
Here the Austrian centre begins to move forward now that the left looks to be getting the upper hand.
God I hope they are or these lot will get rolled up by rampaging French Cuirassiers.    

An Austrian general directs fire from this foot battery.

A good shot of the Austrian heavy cavalry reserve brigade.
Massed Austrian Kuirass await the order to advance.  

I think these are Stipsic's Hussars - very colourful.
This is a large formation in GdA terms at 32 strong.  

Austrian general wipes his brow; all this leading from the rear is a tiring business!

Another Austrian general & ADC who seems to be distractedly amused with sheep worrying - a serious offence in the UK. 

A handsome chateau at the end of a suitably majestic long drive. In time the trees will grow to provide a long shaded avenue approach to this well appointed country home.
I should be in property sales. Doh! I am.     

From the French extreme left looking south west.

The delays on the Austrian right at the hands of French heavy cavalry & guns mean that this village & junction have been reinforced by another brigade so any attack here will be doubly difficult for my Austrians.
Well played Frenchy!  

The scene to the west of the above shot. The Grand battery keeps Horn's boys honest in the dead ground while another French brigade eyes up the gap and junction opposite... 

Looking south west over the Wurtembergers to Friant's battle.

Friant's thin blue line braces of impact. 

The French prop up Friant with this lot of Heavy Metal sneaking around to flank the Austrians. 

This battery has run low on ammo once and traded shots with Austrian counterparts since turn 1.
They are exhausted & have taken very severe casualties.
Time to pull them from the line - grown up wargaming in motion - please applaud now!    

The long view from south east to north west. 

Good overhead shot as the lines close.

Finally the Austrians close with Friant who has repulsed numerous charges with volley & canister.  

Froon's Infantry breaks through throwing back this line.
A battalion of LDW contact the mighty Ironheads of the 8th Ligne as the proverbial hits the fan.
This fight would soon see Friant's brigade retire and the french heavies fail to disrupt the attack. 

Action on the other flank settle down for a while. Meyer's lights would overrun the French horse battery but pay the ultimate price at the hands of the French Carabiniers.
Bottom left Austrian Grenadiers with 12lb battery move up slowly to reinforce the attacks here.  

Successive Austrian charges are repulsed by artillery & fresh French. eventually the French battery is destroyed & the attacks can resume relatively unmolested.   

The Austrian centre & grenadiers moves up to attack.

French Guard cavalry deploy from reserve to sweep around that village to fall upon the Austrian attack columns.  

This French brigade is launched at the junction ahead by the small farm.

History in the making...
Horn has kept his brigade safe behind this low ridge & the French Grand Battery has failed to exert itself, until now.
For some reason the Austrian commander here, (Me...) moved Vogelsang's battalion up as shown above.
The sheer shit storm of fire that hit them is shown by the two double 6's shown above!
They suffered grievous casualties, failed various tests & were flung back over the river.
Next we had to make two Destiny rolls for nearby generals. Result...
General Horn took TWO howitzer shells to the chest, needless to say he didn't make it.        

Frau Horn laments the tragic, if messy, loss of her husband. His remains were scraped into that urn.   

Here we have a pretty picture of  one of Tony's battalions. The hand painted flags are rolled metal welded onto pins and drilled into the model's hand - yes these are 10mm. Brillaint work.    

Here we leave the game for this update. We play again tomorrow night, possibly to a conclusion.

I hope you are finding this of interest? Please follow us if you haven't & comment with feedback, it's much appreciated by the boys & I. Pop back soon for the next instalment. 

Best wishes,

Jeremy