Welcome to Marauder Moments - a chronicle of the Mortimer Street Marauders; the games we play, the rules we use, the figures we play with and the scenery they fight over. Hope you enjoy these pages and maybe call back to catch up with our escapades.

Tuesday 29 October 2019

Prestento Perrini - Late morning action...

The Austrian rush which came at the French occupied most of the early morning. As previous posts have alluded to these rushes were to have serious consequences later in the day for both sides. For now they have been contained & the initial crisis point has passed, so I can breathe a palpable sigh of relief.

The morning was spent in further maneuver as both side built up positions to launch attacks or hold ground. Al though we saw some lively engagements the "storm had yet to break".   

This post outlines what happened over the morning after the Austrian rush had subsided & before the thunder clap events around noon in the next post. The record of events unfolding are captioned  below the photos as usual.
  
Perrini; The pressure builds - something has to give...

The Austrian Avant Garde was in possession of Perrini from the early hours. Their light infantry with cavalry support had raced ahead in a "dash of derring-do", their boldness paying off as the Austrians have a strong position to defend around the objective. The French & their allies can only set up an assault as more Austrian infantry move up to support the position.   

The French Division tasked with taking Perrini comprised two brigades each with five battalions, skirmish screen & a foot battery. These two batteries sat astride the Perrini Road and began a murderous fire on the village. Nordmann, commanding the Avant Garde, sent out a battalion of Jaeger in line to disrupt any attack & to screen the village. Sadly for the Jaeger they attracted the concentrated fire of the two batteries & subsequently the attention of French Voltigeurs too. A large battalion of Grenz on the hillside weren't spared either - losses mounted rapidly.    

The pressure built up on the frightfully exposed Austrian light infantry... something had to give.
As it always does it happened suddenly & with grim severity; the Jaeger had enough & dispersed fleeing back through the crowded streets of Perrini. Seeing this the Grenzers took flight too. 

Sensing things were going terribly wrong the Prestento garrison fled alongside the bloodied Jaeger and soon the whole infantry brigade was in full retreat. The red markers above show retreaters trampling the the fields of hops in their panic. Even the battery limbered up. French Volitigeurs unable to believe their luck cautiously nosed into Perrini & took up positions, their morning's work was only just beginning.  
Nordmann tried in vain to rally his brigade but no one was listening. Poor Nordmann was swept along in the chaos & his command disintegrated - scratch one Austrian brigade from the roster! 
The French could now move up with some security, indeed they limbered a battery and crept up. Austrian supports were a little too far away or screened by their own cavalry & a hefty walled farm to immediately intervene.  

The actions around Prestento come to life

Despite the aggressive action of Austrian Uhlans & Hussars Prestento was in French hands early on. However the Austrian light cavalry had prevented the Polish Division's brigades from supporting the position. A forced march by an Austrian infantry brigade had covered a lot of ground and was now poised to begin a concerted attack on De Bruyere's position in & around Prestento. In concert with the infantry brigade a brigade of Grenadiers had come up from reserve with a 12lb battery and was lining up a frontal assault on the village itself.      

De Bruyere lost a battalion as infantry Regiment Chasteler charged the French trying to form ordre mixed.
The gap on the left shows where one battalion stood just seconds before.   

The following bayonet charge routed three battalions who fled leaving the last one clinging onto Prestento for now.
The left most Austrian battalion is Chasteller's; they have turned to form line as Gerrard's men are threatening to turn their flank. De Bruyerre is an admirable leader rallying his men immediately time & time again. 

To the right of Prestento we see that Montbrun has driven off much of the Austrian cavalry clearing the way for the Polish infantry to help out at Pretsento on the left of the frame above. One Polish brigade heads for the Austrian masses up front, the other swings around the hill to support De Bruyerre and stabilize the position at Prestento before it becomes untenable.


The French left

The northern sector of the battlefield has so far been fairly quiet, largely thanks to the prayers of the Dentino's, see the last post.
Morand's dragoons moved up towards the Austrian chevau legere but were unable to prevent a cloud of Grenzers from sniping at their horse battery which began to become intensely irritating.  

Here we see French dragoons lining up against the smaller Austrian cavalry regiments.
The skirmishers on the right take pot shots at the horse battery. Grrrr!!!  

The immediate solution was to limber up and pull back, the dragoons in column pulled back too as the Austrian gunners were proving fairly accurate. This front remained quiet otherwise. 

The centre

The centre has been strangely quiet despite being a large open space & vital to either side capturing the twin villages. Both sides had deployed reserves in the centre rear with scant resources up front. The late morning saw the some developments here not that significant.  

Here we see Gerard's brigade foolishly fanned out but as fanned out as the Austrian brigade. To the left three columns head for Prestento where they very nearly upset the Austrian attack with a flank charge which could have rolled them up. Instead long range artillery fire drove back the lead battalion in retreat - see red marker.


  The saving grace allowed by the Austrian artillery above allowed  the nearest Austrian battalion, Chasteller, to turn to face in line, on the right. Elsewhere Austrian Grenadiers can be seen crossing the fields around Prestento as a brigade of Austrian Kurass head forward from reserve, top left.

In the French centre the C-in-C orders forward the Guard infantry and Guard artillery. 


Austrian heavy cavalry move up in strength from the reserve. Perrini is top right. 
I imagine time with my gaming chums rather like this... jovial & convivial - relaxed & stress free. Add caption
My gaming chums & I when the table top battle really kicks off!
Not really but it tickled me to conjure with the idea.
There we leave it for now. The events at noon are nearly ready to post to pop back soon. We play again tonight so with luck there will be yet another update moving the game into the afternoon.
My mind is also idly playing with a caption competition featuring a real life prize & another reader driven game project too, keep an eye out for those.

Very best wishes,

Jeremy     

Saturday 19 October 2019

Prestento Perrini 1809 part 2 - The Battle gets underway.

The battle gets under way...

This update sets out the first seven moves from the armies breaking camp at 6am until about 10am.
The early moves in these games have always been rather sedate as the distance between the armies is beyond artillery range, we generally content ourselves with maneuver, each side jockeying for position and probing with light troops to seek out a weak spot. This gentlemanly approach eases one into the engagement as things begin to hot-up and the ebb & flow of battle takes over.   


Nice shot across the centre showing the Austrian Advance Guard with significant support in depth.
French & Wurtemberg columns prepare to assault them.   
The French order of Battle.

For those who like to know how may lives I had available to squander my order of battle is listed below. This runs from right to left on the tabletop once my flank marchers had arrived. Please note that my generals are a mixed bag of names so please forgive the unhistorical rank a few have been landed with & erroneous geographical location they find themselves in - this is a fictitious battle.

Lecchi - 2 x 24 Hussars, 1 x 24 Chassuers a cheval.
Pajol -  2 x 24 Hussars, 1 x 24 Chassuers a cheval, horse battery. 
Villata - 2 x 24 Polish lancers.
Tharreau - 4 x 36 Polish line, 8 skirmishers, foot battery.
Friant - 4 x 36 Polish line, 8 skirmishers.
Montbrun - 2 x 32 Cuirassiers, horse battery.
De Bruyere - 5 x 36 French line, 10 skirmishers, foot battery.
Campans - 32 Dutch "red" lancers of the Guard, 32 Chasseurs a cheval of the Guard.
Davout - 4 x 40 Old Guard foot.
Broussier - 2 x 12lb Old Guard foot batteries.
Gerrard - 5 x 36 French line, 10 skirmishers, foot battery.
Dupont - 32 Polish Guard lancers, 32 Grenadiers a cheval.
St Germain - 2 x 32 Cuirassiers, horse battery.
Delzons - 5 x 36 French line, 10 skirmishers, foot battery.
Eugene - 5 x 36 French line, 10 skirmishers, foot battery.
Ochs - 5 x 36 Wurtemberg line, 10 skirmishers, foot battery.
Morand - 3 x 32 Dragoons, 1 horse battery.

Totals: 37 Battalions, 19 cavalry regiments, 12 batteries, skirmishers & generals.
This equates to just over 2,000 models representing an army of over 40,000 men - quite a large engagement. 

These figures tell me that we don't have enough infantry yet. Never fear another 9 battalions are underway and our next expansion sometime next year should see another ten making 56 which finally eclipses our 28mm collection.        

The initial Austrian "Rush".

In uncharacteristic fashion the Austrians launch two very aggressive moves at 6am while the French are still brewing coffee & eating snails for breakfast! Here the Avant Garde brigades hurtle forward to secure Perrini. This shook my world up a bit!

Looking over the Austrian Avant Garde towards the waiting French lines. The infantry light brigade dashes for Perrini, it's  comprised of Jaegers & Grenzers. The attached cavalry brigade is quite pokey comprising 2 x 24 Hussars & 1 x 32 Kuirass, these secure the hill to prevent a flanking move on the village by the sneaky French!  

The Avant Garde are very well supported by this large Austrian infantry brigade. The Avant Garde possibly isn't strong enough hold Perrini under sustained attack so this lot looks quite capable of doing the job for them.  
Here we see the action a turn later... unexpectedly the Austrian cavalry weren't simply holding the hill...Oh no, they had far more ambitious ideas. They descended the hill and made for my two batteries, one of which went low on ammo in the first turn - some imbecile packed baguettes instead of round shot! However some concerted/lucky canister fire caused enough brave men to tumble from their chargers driving the Austrian heavies back through the hussars. This caused considerable disorder in their ranks & I could breath easy again. Happily a caisson with fresh ammo arrived too.         


Here the scene shifts south to environs of Prestento. Once again the Austrian cavalry are in aggressive mood...

Here we see a menacingly large Austrian cavalry brigade deployed opposite the Polish Division's three brigades. Much like the Avant Garde they made a rush at my lines intent on riding around Prestento to seal it off while supporting infantry occupied the town itself. This brigade comprises 2 x 32 Uhlans & 1 x 32 Hussars. To their rear is another smaller light cavalry brigade with 2 x 24 Chevau legere. Excellent news for my Poles!!! 

Here we see the Austrian cavalry tearing across the countryside with more behind them and a large infantry brigade trying to keep up too. This blatant aggression drew out a brigade from my reserves, here Montbrun snakes his Cuirassiers over the hill to see them off. 
These initial Austrian attacks were to have far reaching consequences for both sides so it's worth chatting about them for a moment. The picture above shows Prestento surrounded by fields & unoccupied. To the left of the picture we can see part of De Bruyere's brigade approaching the village with his artillery deployed up on the hillside. The Polish Division, (on the right) was to sweep around the hillside to seal of the southern outskirts of Prestento from counter attack, they have two small infantry brigades & an attached brigade of 2 x 24 Polish lancers. I didn't fancy facing five Austrian cavalry regiments with only two so my plan was looking pretty desperate by now. BUT - The Austrians had for some reason NOT deployed any infantry to directly assault Prestento, see above the wide open space behind the village stretching right back to the reserves miles away, so Prestento could still be mine.

The Austrians weren't to know that my flank marchers, two brigades of French light cavalry, were about to arrive to the south (right hand side in the above) but they would be too far away to influence this rather immediate problem which might become a potential crisis!   

My only sensible response was to release Montbrun's heavy cavalry brigade from reserve & rush it up squeezing through where they could. Not ideal so early in the game but hey, what's a Marshall to do?
We'll return to this situation again as it absorbed both sides around Prestento until around late morning possibly midday.   

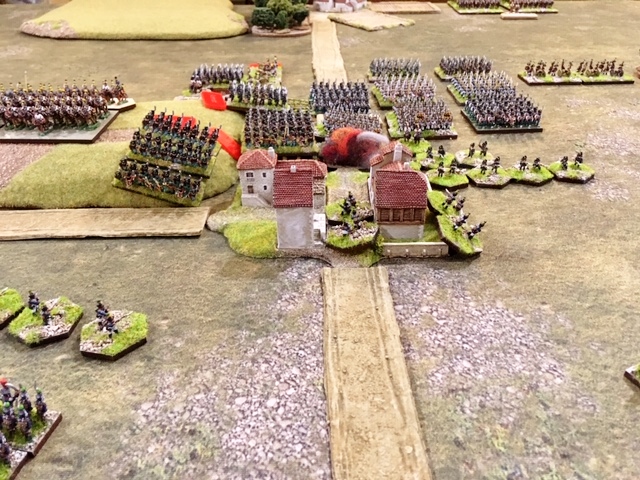
A little later the Austrian light infantry battalions occupy Perrini & demonstrate in front of the town astride the road. The Austrian cavalry has suffered further disorder as round shot keeps falling amongst them, interestingly the Hessen Homburg hussars launched a charge to clear away the French skirmish screen which it did, but not without significant casualties forcing them to retreat. Two French & one Wurtemburg brigade position themselves to assault the position of the Avant Garde in & around Perrini. Note the impressive spectacle of two large Austrian infantry brigades ready to support the Avant Garde in and around Perrini.  

This shot zooms in a little on the above pic. Eagle eyed regulars will note that French line battalions have received some tarting up since the last battle. We three Marauders spent a famously relaxing weekend by the seaside and took some time to paint in the company pompoms and highlight the plumes on all 20 French battalions, that's 720 blobs of paint!
Flags to follow... that'll be a ball ache!     

The French response 

While the Austrians seem to be on the front foot my French were far from idle. Below we see efforts to draw the Arch Dukes eye off the prize as my own cunning plan develops. To be honest much of my early to mid morning was spent dealing with the Austrian "rush" but I had a few "nudges" to make myself!   

On my extreme left flank in the northernmost sector my brigade of dragoons inched forward to draw the attention of the loitering Austrian light horse and to pin the Austrian infantry in place preventing a lateral move to the south, I didn't want them interfering with my attacks on Perrini. The dragoons have a horse battery so a local advantage is possible.
The foot battery deployed on the hill belongs to the Wurtemburg brigade off screen to the right.          

Here we Perrini in Austrian hands. The supporting brigades are somewhat lagging behind so these French columns line up to assault Perrini while the massed batteries cause carnage on the Austrian light battalions deployed in front of the village.  

Outside Prestento De Bruyere's infantry approach the village as their skirmishers seek out positions to loop hole the walls.
The Austrian uhlans take horrendous losses and fail to close with the lead battalion & are driven off.   

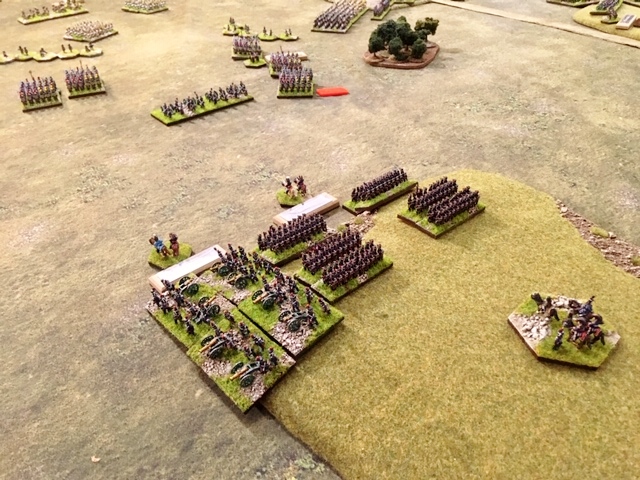
This shows turn four at about 8-00am. Pajol & Lecchi arrive with their respective light cavalry brigades in the south and eye up the fat target of Austrian battalions to their front. This picture demonstrates nicely the sheer space available to us by using 10mm toys on a 18' x 6' table.   

The forward motion of the Polish division is held up by ever more aggressive action by the Austrian cavalry. Here Stipsics hussars charge after Arch Duke Karl's uhlans have been driven off - their attacks are relentless.
This picture shows more details of the work Tony in particular put in over our weekend by the sea. The Polish foot arrived from the painters without pompoms or the characteristic White piping around their square topped head gear - the famous, if unpronounceable, Czapska! Tony applied the piping, I dotted pompoms, Chris stoically based more models; a very therapeutic afternoons work. 
    

This shot pans out from the above shot. The Polish division's advance is stalled & Montbrun has made little headway over the hill with his heavy cavalry. For now the Austrian hussars & uhlans sit back & count the empty saddles - there are many but their sacrifice has bought valuable time for Archduke John. Perrini has been occupied by the French who soon garrison it. The rest of De Bruyere's brigade tries to form ordre mixed as fresh Austrian infantry double pace up to recapture the position. It looks as if the twin towns will see some intense fighting this day.     

The broader battle

These last few shots capture the sense of the game & provide a few close-ups. 

This is Salvatore Dentino's hilltop farm. The Dentino family have farmed here since the land was gifted to them in the time of the Borgias. Today two newer European dynasties fight across the Dentino ancestral lands, the family pray that their home is spared the ravages of war. In the background French dragoons move up the secure the northern flank.  

Two regiments of Austrian chevau legere from Baron Homburg's brigade. They face the French dragoons oblivious to the prayers of the Dentino family. 

Forces gather before the storm around Perrini - this has yet to really "kick off".

A fine shot looking down on Perrini showing the strength both sides have committed to capturing it. Seven brigades are about to close in a struggle to the death.  

The situation in the north is rather quiet north. Both sides are creeping forward. The Dentino family shutter the windows & bar the doors against the coming storm...  

The French CinC calls upon the Old Guard to support the centre. To their left the two reserve batteries think about moving off too but seem reluctant. Their 12lb'ers will be needed up front I suspect.  


The French centre faces a far stronger Austrian brigade so could do with the Guard to stiffen their purpose!
In the background we see Perrini in the eye of the storm.

Arch Duke John has double paced an infantry brigade and a reserve brigade of grenadiers to recapture Prestento.
De Bruyere tries to deploy to face them but time might be against him as the line & columes struggle to sort themselves out.     

The southern flank at the end of turn six, it's about 9-00am. The Poles and Montbrun are at a standstill - still.
The weary & battered Austrian light cavalry are now supported by infantry but they are in turn severely threatened by the sudden eruption of fresh French light cavalry with horse battery arriving on their flank. Top left we can see the smaller Austrian cavalry brigade of more chevau legere move south to stem the tide.   

The picture shows the scene at about 9-30am. Montbrun has nearly deployed and the Schwarzenburg Uhlans are dispersed.
Villata's Polish lancer brigade has cowered all morning, presumably too sensible to tackle the larger Austrian regiments.
Top left we see De Bruyere's boys caught off guard by another Austrian "rush" this time on Prestento. The massed white ranks crash into the ill deployed French lines scattering the lead battalion, the Austrians now out numbering the remainder...       

There we leave it. The sequel is underway so keep an eye out for it soon. I have tried to bring some life to this batrep trying to avoid a dry series of pictures of tiny men. Hopefully the more detailed commentary allows those who actually read this drivel to more closely follow the action. The Austrian order of battle will pop up for those interested at some point too. As usual please comment and click follow if you haven't.

Best wishes,

Jeremy        

Saturday 12 October 2019

The Battle of Prestento/Perrini - Italy 1809

Strategic Background

Having successfully forced a passage across the Edro Archduke John's Austrians are typically ponderous in pursuit. The French Old Guard & the fresh troops of Dupont's brigade cover the remaining shattered brigades over the last bridge held by the French as dusk turns to night. With the Austrians content to occupy the field, bury dead & tend to wounded Eugene's French escape. The following day allowed both sides to regroup, bring up replacements for casualties & call in outlying reinforcements stationed near the theatre of operations.

Approaching Perrini from the south.
Not to be deterred by this "minor set back" on the Edro Eugene's French seek out another rout to outfox the dull Austrian high command. The two armies circle each other on the plains & foot hills, each gaining a temporary advantage before losing it again. Napoleon writes to Eugene almost daily with sage advice. Archduke John doesn't benefit from such a tutor & is left to his own devices aside from the political machinations emanating from Vienna!

The road to Prestento. 
Eventually however Archduke John manages to insert much of his army in the path of Eugene's latest advance. He blocks the French maneuvers along two roads traversing a broad fertile valley with gently rolling hills, scattered woods, farms & orchards. Both generals sense they can achieve a decisive victory here & call in their outlying forces to maybe out flank the other. The two roads are straddled by two small villages, Prestento & Perrini respectively. History would lend their names to the ensuing battle.

The picturesque roadside chapel of St Francis of Assis.
So, we have a battle with a narrative & a geography. Both sides will be reinforced making this a bigger battle than the Edro engagement. Chris & Tony pointed out that I had yet to take on an independent command so a quick dice roll determined that I would command the French as Eugene in the coming battle. To be honest, despite my initial nervousness, I relish this opportunity.
There will be more toys & more space to play with. Being solely responsible for a whole army is somewhat daunting but also an immensely enjoyable, if challenging, experience - I can't blame anyone else this time. This will be personally taxing & probably stressful too - all the hallmarks of a memorable wargame.

Arch Duke John's milkshakes leave the foothills of the Edro region & march into a gentler geography!   

Hungarians from Arch Duke John's army trudge through yet another nameless village.
The game will be fought in 10mm before you get your hopes up too much for a 28mm bash! 
The battlefield tour

The table is set & armies deployed. Here's a whirlwind tour. My cunning plan & army structure will form a separate post.

French deployment

Most of the table with most formations deployed. Tony surveys his Austrian warhost.

The French right wing. These are new toys, our Polish Division, two small infantry brigades, a cavalry brigade made up of two regiments of Polish lancers. The formation has an attached divisional Polish foot battery.
Their's is a tough job; fend off fairly substantial enemy attacks & swing around the hill to support the frontal attack on Prestento.       

Prestento is the prize for this French brigade, their foot battery is up on the hillside.
Behind the infantry in reserve is a brigade of Cuirassiers with attached horse battery, hopefully the threat of these will keep the enemy honest?   

Here is the mighty French centre.
The Old Guard foot stand behind another infantry brigade about to march off to attack, guns up front.
The hill is flanked by two brigades of Guard cavalry & the Guard artillery can be seen squeezed in there too.  

Moving left... top right is Prestento. On the right is the central French position with the Guard etc.
In the foreground we can see another Cuirassier brigade supporting the first of two infantry brigades setting off to assault & capture Perrini. 

There's Perrini - just up the road! To the left of the road is the second of two French infantry brigades tasked its capture. The batteries for both are deployed forward to bombard any Austrians who stray to close. 

My left is held by the Wurtemberg brigade & another new formation of toys, a brigade of Dragoons, 3x32 plus horse battery.
My extreme left is where the Austrian flank marchers are expected to arrive, not sure exactly where or when though...  
Austrian deployment

Tony took on the mantle of Arch Duke John as Chris was away for some reason which eludes me right now. Their objectives were the two villages of Prestento & Perrini and of course the destruction of the French field army - bah!

Here is how the Austrians deployed from their right flank to left opposite my French. 

Here we see Baron Homburg's light cavalry brigade supporting an infantry brigade to their left.  

Here we see them again, these are pretty much opposite my dragoons. 

The Austrian centre is a tough nut - well deployed and in depth. Here see a powerful infantry brigade ready to move up behind the Advance Guard who we allowed to deploy ahead of the main lines. The Austrian Advance Guard is a small division comprising a brigade of  jaegers & Grenzers plus a cavalry brigade comprising two regiments of Hussars & one of Cuirassiers.   

Also trailing the Advance Guard is yet another powerful infantry brigade next to the woods and the walled farm complex.
Next along are two brigades of Cuirassiers in reserve sitting pretty much dead centre.   

Yet another infantry brigade with the army artillery reserve behind it and two brigades of Grenadiers near the village on the back line. Curiously there are no infantry ready to pounce on Prestento...

The same view as above but from a different angle, looking north west.
Perrini is in the distance.

This took me by surprise!
We deployed alternate brigades deciding to dispense with maps. These two brigades of light cavalry are ordered to encircle Prestento cutting it off from the French & Polish forces opposite. The presence of such large amounts of cavalry subsequently rushed forward very aggressively was to have quite severe consequences for both sides early on. The lead cavalry brigade is strong, 2 x 32 Uhlans & 1 x 32 Hussars. Chevau Legere offer rear support.

The Austrian left is held by yet another powerful infantry brigade.
To the left their flank is wide open. Scout warn that French light cavalry will arrive but they're not sure when or where. 
A note on deployment... 

The table is about 18 x 6 feet. The deployment zones are both slightly off centre so each side initially overlaps the other on one flank. Both flanks are deep and fairly open to allow on table maneuver.
Light cavalry, skirmishers, Austrian Advance Guard & artillery may deploy up to 24 inches on. Brigades in the line of battle are deployed up to 12 inches on. "On table" reserves must touch the back board edge. Each side could mount a flank march to arrive from turn 2, (pre-recorded) and arriving 2, 3, 4, 5 or 6 feet along the flank depending on the turn of arrival eg turn 5 five feet across. Flankers were limited in that heavy cavalry or army reserves couldn't flank march. Either side could have trailing forces, once again with a turn & point of arrival written down beforehand.       

Perrini is abandoned and the streets quiet. French batteries prepare to deny it to the Austrians.  

Prestento surrounded by fields, the crops gathered and whisked away before armies trample them to mulch!   
So, I have a strong army and a great plan - I am feeling confident. What could possibly go wrong...


Tony and I played turns 1 & 2 having deployed. Chris joined us from turn 3. The next post will begin to record the battle as it unfolds.

I hope gives you a taster of what is to come? As usual feel free to comment or post questions & of course "follow" if you haven't already.

Best wishes,

Jeremy