This long old post wraps up the Battle of Prestento Perrini.
The action around midday represents the most intensive session of wargaming I can remember playing for along time although it doesn't translate to blog so well possibly!
This report is in two parts; the various sectors at midday and then the inevitable close.
 |
A lovely command vignette from my 28mm collection.
Front Rank Bavarian models painted by Tony Laughton. Veteran readers may remember Mr Grumpy?
Never fear I still have him. |
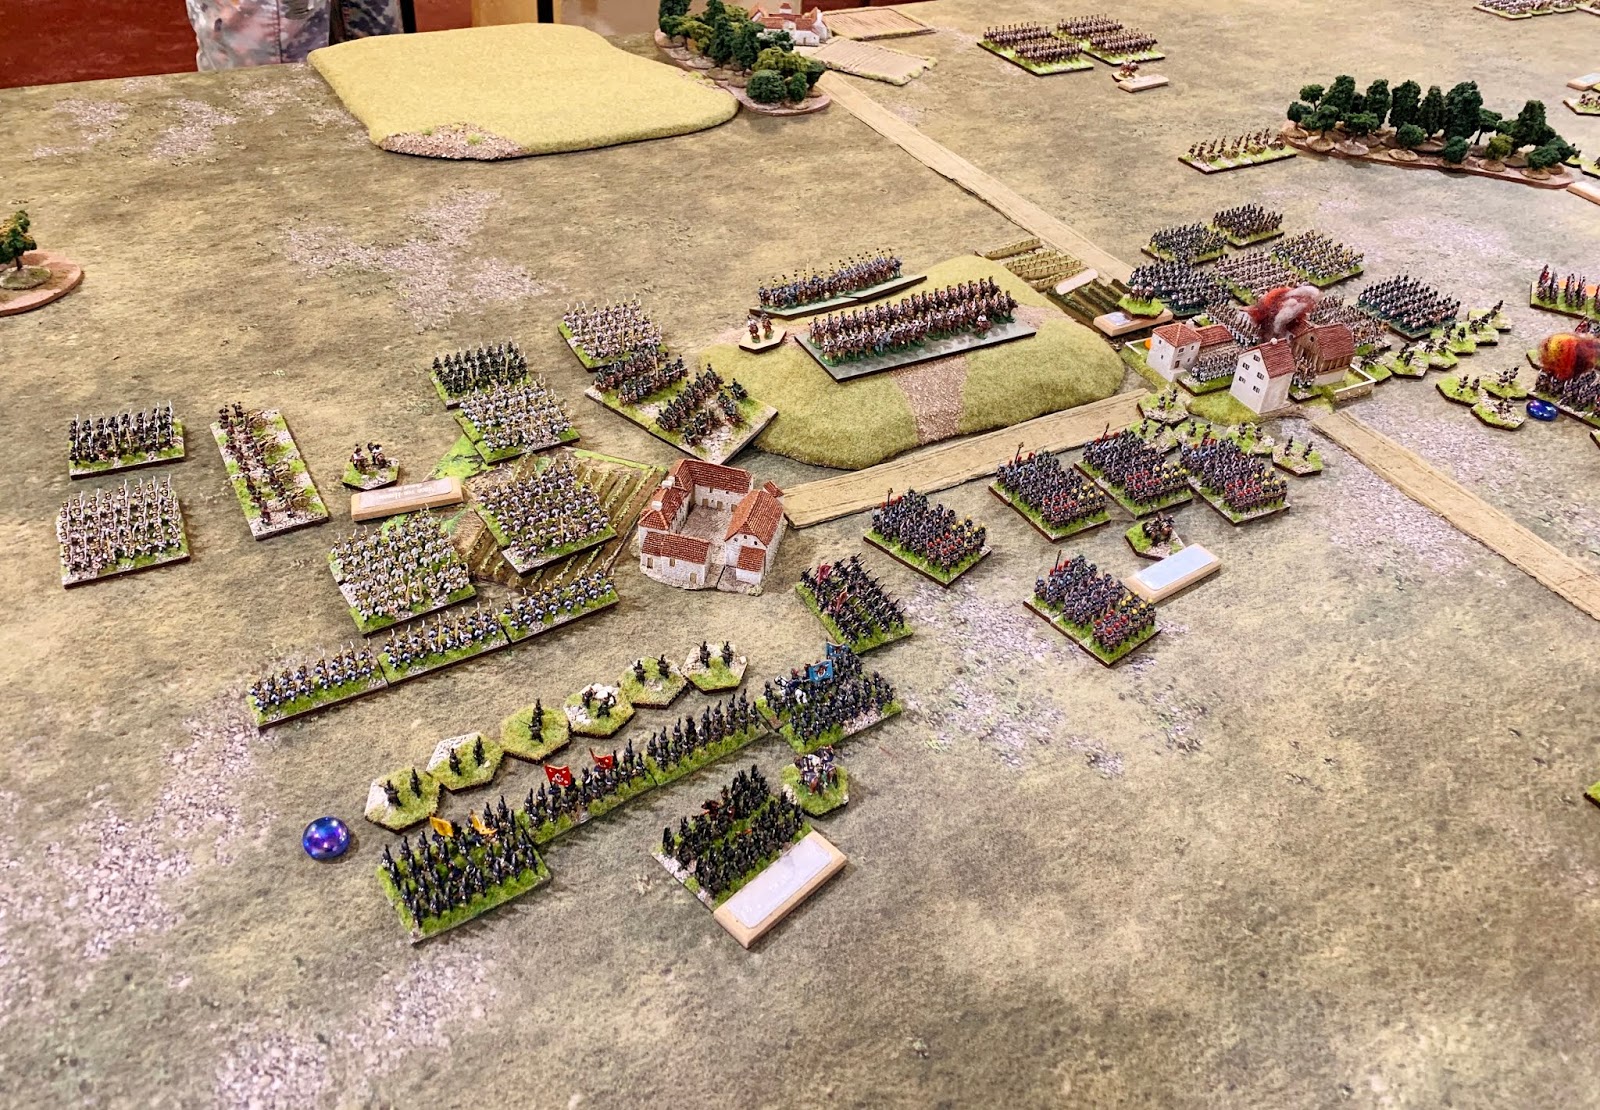
The situation at midday.
Minor engagements in the northern sector
 |
| Morand's dragoons continue to press von Homburg's lights & pin Baron Zach's foot. |
 |
This pinning action was not without cost as Austrian artillery kept up a constant draining fire.
Austrian jaeger also chipped away at the horse battery. |
 |
| Morand led two regiments of dragoons against the smaller & lighter Austrian horse and drove them off in retreat. |
 |
| The Dentino's hill farm remains unmolested so far... |
 |
| The Austrians rallied on the world's edge - lucky bastards! |
Stalemate at Perrini
 |
The stalemate here continued for two reasons. The Austrians struggled to get Von Hammer into a sensible attacking position having created a bottleneck around the farm & vineyards. Their cavalry proved hard to extricate and the town of Perrini was very well held and supported in depth.
The French never really mustered the momentum,or frankly the balls, to attack either! |
 |
| The strength of the Austrian position around Perrini is well illustrated here. |
 |
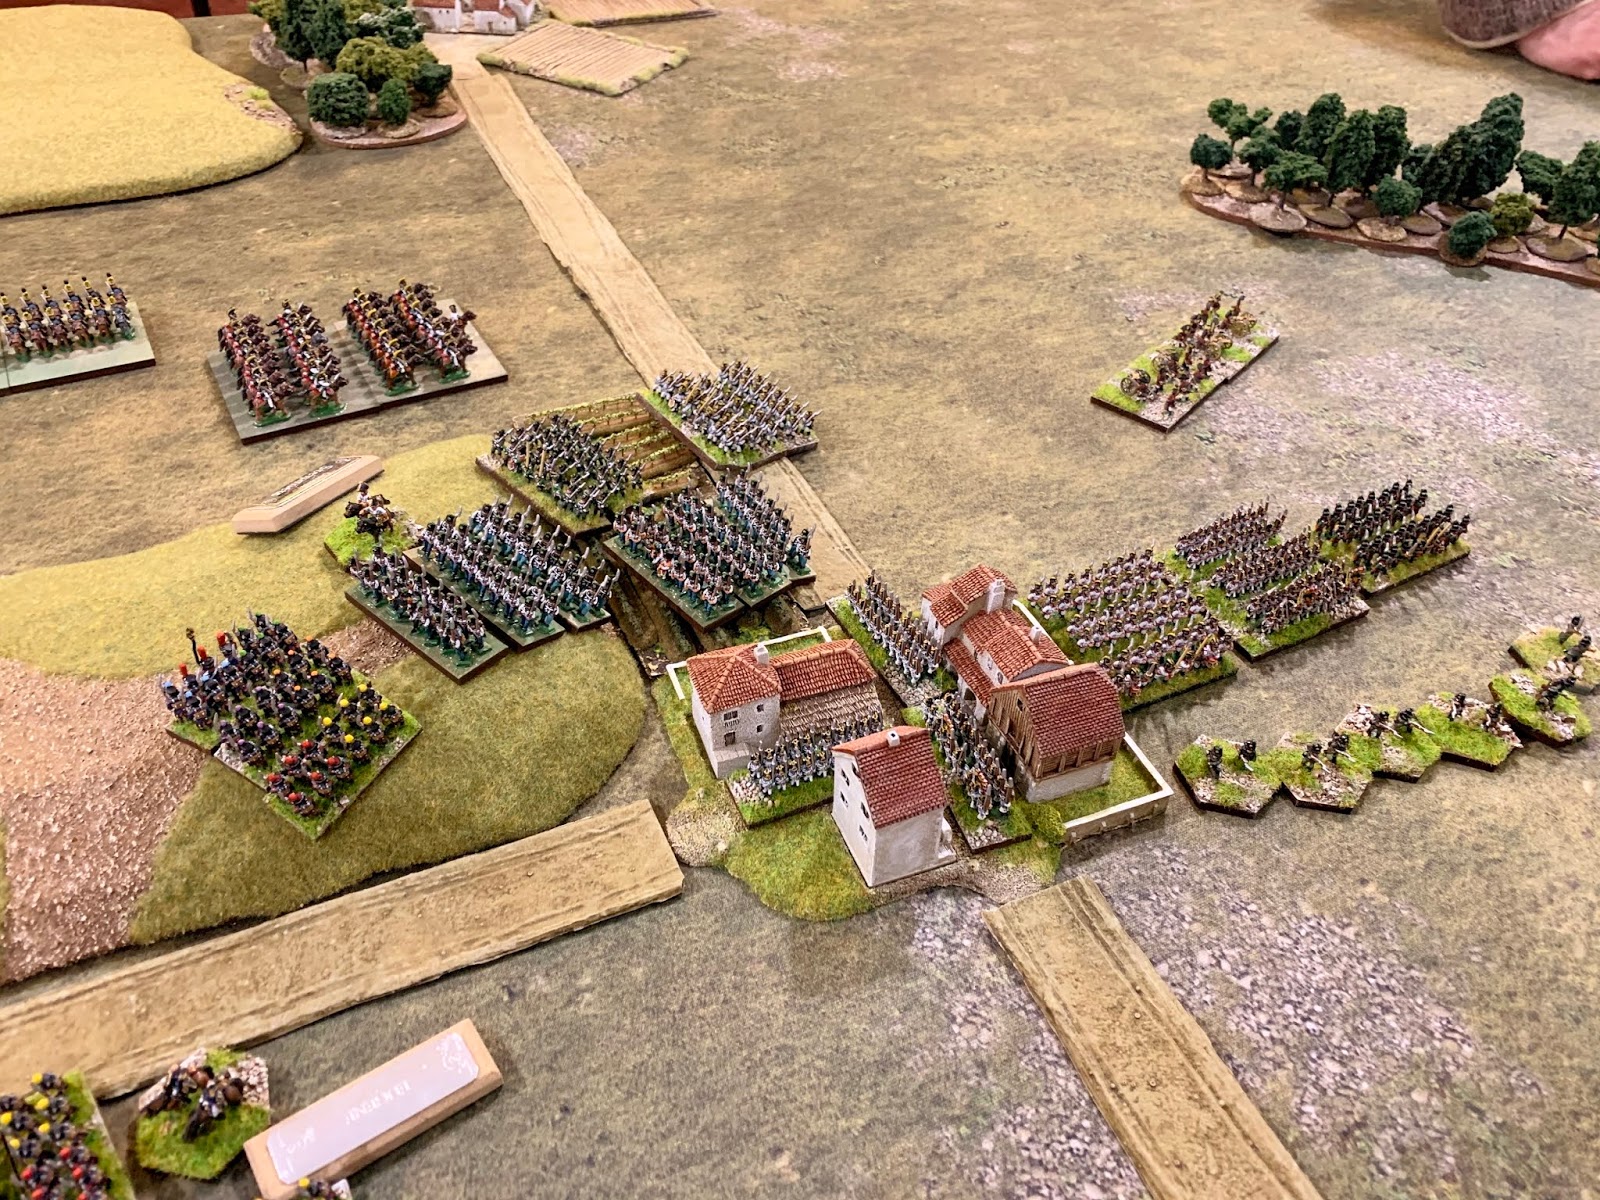
An aerial shot taken from my observation balloon.
Here see Ochs bottom left setting a trap for von Hammer's lead units as they round the farm complex. |
 |
The fiendish trap fails to stop a massive Austrian column from trampling the 1st Wurtemburg into the mud!
This action faltered Och's brigade & signaled that the position was suddenly shifting. |
 |
Two French batteries keep up a constant fire on Steinmetz brigade in Perrini as Delzon approaches to assault the position.
Note top right... two regiments of Austrian Cuirassiers approach the front from reserve.
Under this bombardment Steinmetz was constantly at the front bravely steadying the lines.
Sadly he paid the ultimate price. |
 |
| General Steinmetz pretty young wife laments the unsightly passing of her husband in Perrrini. |
The centre kicks off...
 |
Just as general Steinmetz fell so some Delzon's battalions began to retreat and his brigade faltered - Aaaaaarrgh!
To add insult to injury one of the batteries ran low on ammunition again!
Would we never mount a serious assault here? |
 |
Here we see the two Old Guard foot batterires moving up limbered beside the four battalions of OG foot.
Nothing to see here. Especially not the Austrian Cuirassiers just out of charge reach approaching at speed... |
 |
| Here another small brigade of Austrian Grenadiers moves up to secure Prestento for the Austrians while the Poles try to line up an assault to retake the town. |
 |
Here we see Austrian Cuirassiers & a once in a lifetime opportunity directly ahead...
Moving swiftly on though please. |
 |
We're not going to be "swiftly moving on" because here we see a Limbered Guard Artillery shaped hole in my line.
It is no consolation that I can flank the offending Austrian heavies.
This is my fault, this is unforgivable. I am a bad general.
General Broussier died trying to save his guns in a hopeless situation.
How do I explain this to Head Office let alone to his wife? |
 |
| Madame Broussier is inconsolable at the news of her husbands inglorious demise (as he led the STILL limbered Guard foot artillery into melee with Austrian Cuirassiers - with predictably messy results). |
The Prestento front erupts
To recap; Prestento has been wrested from French hands by Austrian Grenadiers who are busily building a strong position to hold it. De Bruyere's French brigade is badly mauled; the Poles are moving up to show them how it's done.
 |
| De Bruyerre's brigade is badly mauled and in retreat. The supporting Poles line up retake Prestento. |
 |
| Further aggressive Austrian defense drives off de Bruyere but not without loss to themselves & some disorder to the formation. |
 |
| Gerrard's attack is held off again and his brigade falters too. |
 |
| Austrian grenadiers support the garrison while French Cuirassiers look dangerously rampant. |
French attempts at unlocking the Austrian right
The story here is one of Kleist's large infantry brigade being slowly surrounded by up to ten regiments of french cavalry whilst more Poles try to unpick the position.
The following photos rather fail to show the repeated charges and artillery attacks on the hemmed in Austrian masses - most of which are repulsed; the Polish infantry especially receive a bloody nose.
 |
| Polish infantry approach the hemmed in brigade of General Kleist. |
 |
| The noose tightens. |
 |
| The French & Poles have driven a wedge between the Austrians in Prestento and the southern flank as they seek out an opening to mount an attack. |
 |
| In go the French lights... |
 |
| ... Off bounce the French lights. |
 |
| Lining up for another charge. |
 |
| The Poles go in again while French Cuirassiers damage but fail to destroy the Austrian light horse. |
 |
| At long last something gives! French light cavalry run down an Austrian regiment effecting a possible breakthrough as the enemy brigade falters... |
Lunchtime & early afternoon turns nasty...
The right/southern sector
 |
| The trapped Austrian infantry mostly formed into square just about hold out for now... |
 |
| Kleist rallies his men and they stand firm despite the raging tide of French light cavalry frothing around them. |
 |
| Polish infantry dispatch the Austrian battery but then both Polish foot and attendant light cavalry go hesitant !!! |
Prestento
 |
| The lead Polish battalion charges Prestento - This village is mine by Divine Right... |
 |
No Divine Right in this game! The lead battalion retreats through it's support unforming them.
"Dum diddly dum...! |
 |
| Two Austrian 12lb foot batteries deploy from reserve behind Prestento and begin to fire on the French heavy cavalry marauding around top left. This starts to hurt. |
 |
| Polish infantry & French heavy cavalry attack Prestento from the South . |
 |
Here a French horse battery attached to the heavy cavalry fires on a square of Austrian grenadiers in the ploughed field as heavies charge them - classic combined arms at work. Needless to say the charge is repulsed - also classic!
More Austrian grenadiers approach Prestento from the top left. this is proving a tough nut to crack. |
The centre
The centre is finally coming to life after both sides dithered during the morning. In essence there is one large Austrian brigade thinly spread across the gap between the twin villages. They are supported by grenadiers and more lately by Cuirassiers too. One regiment ran down the French Old Guard foot batteries while limbered (I know - shameful), these were in turn roughly handle by French Carabiniers and routed towards their sister regiment which is facing off against their French counter parts. The Ffrecnh Guard infantry are creeping forward cautiously mindful of Austrian heavy cavalry in the area. Poor old Gerrard is in retreat and possibly won't be coming back.
 |
| Old Guard advance as Gerrard retreats. |
 |
| Same situation - different angle. |
 |
The southern flank of Perrini where the action now overlaps with the centre.
French infantry attacks stall against stoic Austrian infantry including a nice long line. The death of Steinmetz id long forgotten; except by his wife obviously.
Note the approach of Austrian heavy cavalry top centre... |
 |
| Opposing heavies slug it out in the centre. |
 |
Gerrard quits the field so two Old Guard battalions swing around to deal with the Austrian threat (screen right).
Battle rages around Perrini in the back ground. |
 |
| Here we see the Austrian depth of defense around Prestento. The village and immediate environs are held by three grenadier battalions, three more are in support with two 12lb batteries bombing the crap out of anyone brave enough to venture too close. Retaking this position my not be that easy and even if I can there are enough fresh forces on standby to counter attack - not a luxury I have as the French. |
 |
The French centre with Austrians on the attack!!!
Gerrard is going home, the Guard are plugging gaps & the Old Guard cavalry on the rear edge are about to be released.
This is getting desperate. |
 |
| Carabinier melee with Austrian heavies. |
 |
| Old Guard foot face off Austrian infantry. |
 |
| Chasseurs a cheval of the Guard and Dutch "red" Guard Lancers dash off to help out the Poles who are struggling around Prestento. The lancers are new toys... |
Perrini
Here the stalemate which has persisted since breakfast time was about to be blown apart!
 |
| Von Hammer has cleared the vineyards and is moving on Och's tough little brigade. |
 |
| Oh dear! Not that tough after all. This is all unraveling for my Frenchies. Here Och's brigade takes flight along with their artillery, note it hasn't blown up! Just an overly dramatic "low on ammo" marker! |
 |
Och's departure means these fellas are caught with their knickers down!
Trapped between three brigades - "The catcher caught?" I flatter myself... |
 |
| My position in front of Perrini takes on a D'Erlonesque feel as those Austrian heavies thunder into Delzon's battalions running down two of them and breaking the brigade which streams away on flight. |
 |
| The offending Austrian heavies! I hate these guys. |
 |
| One of two Old Glory 10mm battalions we have. These were bought as a tester early in the project. We went with Magister Militum for most of the foot in the end. These painted up beautifully well though. Thanks to Barry Hill for the brushwork, note the hand painted flags. You wouldn't believe these are cast in five model long strips. |
 |
| The Austrians in strength behind Perrini as the heavies thunder through Delzon's brigade - Uuurrrrggh God! |
The left...
"Nothing to see here Guv". Literally nothing changed; French dragoons pinning Austrian foot while seeing off light cavalry & being slowly whittled down in the interim.
 |
| Looking south west from behind the Austrian extreme right flank. |
Some close-ups
We take a break from the calamitous action to look at toys close up. You asked for it after all...
 |
| French general staff. |
 |
| Carabinier with enthusiastic officer. |
 |
| Polish Guard lancer with even more enthusiastic officer - "Look Mum no hands!". |
 |
| Same unit side on. |
 |
| Zooming in a bit more. |
 |
| Old Guard commander in Bearskin. |
 |
Lovely hand painted flags on the Wurtemburgers by Tony D.
Clever bugger that lad. |
 |
"Giant slayers"
Hessen Homburg Hussars with uber details. |
 |
Cute little hill farm with grazing flocks.
Bucolic bliss. |
 |
| Lowland farmstead with outlying enclosures & formal orchards straddling the road to Perrini. |
The vinegar strokes; climax & collapse...
 |
| Poles dither outside Prestento - everytime they go in they bounce off. The Austrian position keeps getting stronger. |
 |
| Old Guard Dutch Red Lancers & Chasseurs a cheval lurch about and never really get close to threatening the Austrians. |
 |
Old Guard foot in the centre.
"Pleease God help me!" |
 |
| Heavy cavalry go at it again without a decisive result. |
 |
| Austrians at Perrini go over to the attack, here Hungarians flank a French battalion as the position continues to unravel. |
 |
| Back in the Austrian rear we find this attractive walled manor farm with fields & woodland surrounding it. |
 |
| The French around Perrini are melting away by now & more Austrian infantry stream forwards. |
 |
| The extreme Austrian left is still tying up vast amounts of French cavalry albeit in a precarious position! |
 |
| Morand's dragoons finally accumulate enough casualties to begin a retreat. |
 |
With the dragoons "sent packing" this Austrian brigade turns and heads toward to the sound of the guns.
They might be a bit late to the party though? |
 |
| Rear shot of the above Austrian infantry heading for Perrini. |
 |
| The last French brigade at Perrini falters as the flanked battalion routs from the charging Hungarians. |
 |
| Perrini is safe & secure in Austrian hands by now. |
 |
The Austrian centre is stabilized by a mass of batteries & heavy cavalry.
French Guard form line to minimize casualties from artillery fire - top right. |
 |
| More Austrian grenadiers move up behind Prestento. |
 |
| Two 12lb foot batteries cover the rear and southern approaches to Prestento sealing the position for the Austrians. |
 |
| French light horse buzz about uselessly in the face of Austrian squares - what an utter waste of my resources! |
 |
| One Old Guard battalion shows what they can do by seeing off some Austrians (top left) while the Poles hurt themselves against the walls of Prestento. |
 |
| The second Polish brigade falters against continued fierce Austrian resistance, |
 |
| The Old Guard foot hold the centre. |
 |
| The Grenadiers a cheval of the Guard take out a regiment of Austrian heavies in a brutally face saving display - phew! |
 |
| More Austrian cuirassiers sit and wait... battered but unbroken. |
 |
| The end of the French at Perrini. |
 |
| The Wurtembergers call it a day too as most retreat or rout. |
 |
| Nice action shot. |
 |
| Austrian brigade in a sweeping advance in pursuit of their foes. |
At this point, early afternoon, the French began to withdraw their battered remnants from the field.
Losses, especially in infantry were very high indeed. At least the Guard is intact, except the Guard artillery of course... :(
I had lost the battle and with it the French are too short on resources to continue the narrative campaign this season. Time to withdraw to winter quarters.
Arch Duke John has bested Eugene this time.
 |
| "C'est le guerre". |
Conclusion.
So what went right and wrong in this game?
For my part, the French, it was a sound thrashing - proper six of the best, trousers down!
Given that this was an objective based game, the twin towns of Prestento & Perrini, my forces barely set foot in them for five minutes before being chased out at bayonet point! Chris & Tony said they felt "on the ropes" a few times which means I had chances which slipped through my fingers or at least it was a balanced game for them too.
The Austrian plan from the outset, namely the "rush" paid off in the long term. Let me explain...
The initial
rush south of Prestento by the Austrian light cavalry brigade comprising 2 x 48 uhlans & 48 hussars was designed to prevent the French from attacking Prestento by encircling it while supporting infantry moved up. This was never going to work as planned, Chris even commented that the Austrian infantry brigade & cavalry brigade in the south should have been deployed the other way around. He's right - EXCEPT - Tony's plan worked in the long term. The threat to the Polish brigade of two
large regiments of lance armed cavalry with more in support was too great a risk for me to ignore. The advance of the Poles was stalled/pinned whilst Montbrun brought up his Cuirassiers from reserve to deal with the Austrian cavalry. This left De Bruyerre to seize and hold Prestento without support as Von Hammer's far more powerful Austrian brigade in turn supported by two brigades of Grenadiers moved up to evict the French and hold the village until the end of the game. Had the Austrian positions been reversed I would have held Prestento with 13 Battalions and two batteries with Montbrun's heavies still in reserve. This I suggest would have been almost unassailable to the Austrians. At the same time the position of a large brigade of Austrian infantry on the extreme southern flank was perfect for stalling the flank march by 6 regiments of French light horse with attached battery, plus the two regiments of Polish lancers and finally Montbrun's heavies who literally could not break the solid massed ranks of the boys in white. The Austrian cavalry, had they been deployed here, would have been out numbered and out gunned thus letting my flank attack roll down the line making the position to the rear of Prestento untenable which in turn would have strengthened my grip on the village of Prestento. Clever plan Tony, very clever.
Perrini was a slightly different matter. Here Tony, the Austrian C-in-C, launched the
advance guard brigades from a forward position straight at Perrini. The village benefited from a hill directly north and a walled farm house beyond that. The proximity of vineyards caused a bottleneck for the Austrians but they were deployed in depth and mostly safely out of sight. The Austrian cavalry couldn't be ignored so valuable supporting fire was directed at them and not at the town itself. My three brigades assigned to assault this position never really made a serious attack and entered into a lengthy firefight which they won for the most part. In time numbers began to tell though as the Austrians wriggled free of the vineyards. The cavalry withdrew making way for more Austrian infantry and finally heavy cavalry brought up from reserve wrecked my position. The Austrian infantry went over to the attack and the French position unraveled.
My infantry losses were horrendous. My cavalry numbers were not made to count being ineffective or reactive. The battle was won by early afternoon. Well played Tony & Chris.
The General d'Armee rules worked magnificently well in managing an awful lot of models by only three players.
Would I do anything differently in scenario design?
I have spent many hours reading historical orbats of real life battles. These differ from how we structure our armies in a way which I feel has an impact on our games. I usually write the scenarios and then leave the generals to create an army from the toys available, we know enough about Napoleonic armies to get this mostly right. The GdA rules put a limit of 8 units in a brigade and have no divisional level and I can see why. Real armies do have divisions and historical norms for brigade sizes which have an impact on battles in two areas; firstly brigade structure and secondly on deployment especially of reserves.
The limit of 8 units in a brigade is an upper limit
not a target! I would like to see more brigades of 4 - 5 battalions (plus battery & skirmish screen) with cavalry in either two or three regiment brigades plus horse battery if needed. This is more in keeping with my reading of correct compositions and also means that brigades occupy less space and cannot be spread over an unrealistically huge area exerting a disproportionate board control whilst being in real terms impossible to command.
By considering the Divisional aspect, even if not depicting a Divisional command level, we see that most/some troop types were deployed as a division not by brigades spread about liberally. An obvious example of this is my deployment of heavy cavalry reserves and the Old Guard cavalry in this game. I suspect that two brigades of heavy cavalry would have been deployed as a Division whilst operating tactically as brigades; mine were split up at deployment giving me easy options and too much flexibility. My deployment of the Guard Cavalry was the same. I got this concept spot on with the Poles; two infantry brigades each of four battalions with the divisional battery attached to one of them; the attached light cavalry brigade of two regiments operating in support. This forms a tasty formation, self supporting, flexible and just looks and feels "right". (Because it is!). In fairness the Austrians deployed with this concept in evidence if not
in mind. The two brigades of Grenadiers were side by side as were the two brigades of reserve heavy cavalry - funnily enough it worked famously. Clearly there can be exceptions but I think it's sensible to think about this in future games especially at army creation and at deployment.
End piece.
Many thanks to Tony & Chris for a famously memorable game and to you guys for reading and commenting - it is so much appreciated by we three. There are more toys on the way and more planned for 2020. However this will be our last Napoleonic game of 2019, we'll tinker with some smaller projects and then launch a bigger game in January. I have a few more ideas for posts this year and if you haven't already entered the silly caption competition do so - free goodies must be won!
Very best wishes,
Jeremy