THE DANUBE CAMPAIGN 1809
An Epic Marauder
Moment.
"This is a guest post by Tony Laughton in which he outlines the back ground to the campaign game & what inspired him. Much more to follow as the campaign unfolds.
Enjoy."
Jeremy,
 |
| Austrian troops move across the Bavarian border starting the war of 1809 - the Danube Campaign. |
 |
| Overview of the map, books that have inspired interest in 1809, some 15mm figs a bottle of Waterloo ale!! (The whole map is 6 feet long, oh yes!) |
 |
| The unused board game!! |
It was clear from the start, that to achieve this aim, the umpire would have to
do more than just move markers around on the map in response to players orders.
I decided from the outset that the umpire would have to be responsible for all
the paper work and record keeping. This would ensure that the players did not
become bogged down, could concentrate on strategy and ordering their units
around and hopefully thereby avoiding the trap most campaigns fall into…..loss
of interest and boredom.
I set about compiling a guide book for both sides. As the
campaign is running as I type this, I will leave posting a full copy until
later. Suffice to say, the booklet is a guide to the maps, sets out the
objectives for each side, contains a full order of battle on a unit for unit
basis, an initial intelligence briefing and basis information on use of centres
of operations and main supply bases. A few extracts follow to give the reader a
flavour ( all extracts appear in italics)
 |
| Austrian artillery mass to support the attack. |
THE AUSTRIAN PERSPECTIVE
As Generalissimus,
Archduke Charles is responsible for the conduct of the Imperial war effort. At
stake is the very existence of the Hapsburg dynasty and its territorial
integrity. The War Party, headed by Foreign Minister Stadion, has convinced the
Kaiser that now is the time to take action, recover lost lands and influence,
and strike at the interference of France and it’s Emperor Napoleon, in Germanic
affairs. Stadion believes now is the time to restore the Holy Roman Empire with
Austria as the dominant power and the Kaiser as the Holy Roman Emperor.
The Austrian army has
under gone radical changes, but the officer corps remains steadfast in its 18th
Century dogma. Petty jealousies are rife and co-operation between the various
commanders is limited at the best of times. At his command, Archduke Charles
has 6 Corps of the line and 2 small Reserve Corps. His instructions are to
launch an offensive against Bavaria and recover lands ceded to her after the
defeat of 1805. With Napoleon’s war in the Iberian Peninsula going against him,
Stadion has persuaded the Kaiser to authorise commencement of the offensive, in
the hope that the French Army of the Rhine can be defeated before Napoleon can
assume command.
Secondary theatres of
operation will take place in Silesia and Northern Italy, which may or may not
influence availability of further Austrian forces.
The Aulic Council has
set two clear objectives:
1.
The
capture of Regensburg and the destruction of the Royal Bavarian Army
2.
The
destruction of the French Army of the Rhine.
The Austrian Army has
initially deployed the bulk of its formation along the river Inn on the border
with Bavaria. Two army Corps are in Bohemia under the command of Bellegarde,
with instructions to move south via Pilson and Cham to Regensberg.
Independent Landwehr
brigades provide the link between
Bellegarde and Charles and cover the frontier.
Most of the Austrian
formations are yet to reach full strength. Reinforcements are on route and will
be fed into their appropriate formations as the campaign develops.
An early victory is
essential to maintain the political will to continue the war. An early decisive
victory would knock most of the Rhinebund forces out of the campaign and may be
sufficient to convince Prussia and possibly Russia to join the war.
AUSTRIAN OBJECTIVES
These should be
incorporated into the Austrian players strategic plan.
i.
Defeat
the Royal Austrian Army and capture Regensberg w0812
ii.
Defeat
the French/Allied Army by driving it west of the line along the Danube and Naab
rivers.
iii.
Ensure
the Vienna Morale marker on the Victory matrix does not reach -4. If it does
the campaign ends with the collapse of Austrian political will to continue the
war.
 |
| Hungarian Grenzers advance in lengthy line formations. |
THE FRENCH PERSPECTIVE
Napoleon did not want
war with Austria in 1809. His focus was on the Iberian Peninsula and ensuring
the full implementation of his Continental System against British trade. He
also wanted to avenge the defeat at Bailen.
However, as it became
apparent that Austria was taking steps to mobilise, the Emperor took steps in
an attempt to dissuade them from war. He mobilised the contingents of the
Confederation of the Rhine for extensive exercises in central Germany. He
halted Mortiers V Corps on its way to Spain and proposed the call up of a
further 160,00 conscripts. Messena was ordered to commence the formation of a
new IV Corps in south western France. Eugene and Marmont were put on war
footings in Italy and Dalmatia. As an ultimate declaration of his intent, the
Guard was finally recalled from Spain.
Marshal Davout’s
famous III Corps plus attached formations was constituted the Army of the
Rhine. It was with this veteran formation that Napoleon proposed to keep
Austria within its territorial borders pending his arrival with the rest of the
Grande Armee.
Marshal Berthier was
appointed nominal Commander in Chief pending Napoleon’s arrival in theatre. He
did not want to leave Paris too early and thus instigate Austrian hostilities.
Once in theatre he has only one intention – to knock Austria out of the war by
taking Vienna.
THE MAP
• Divided into 3 sections – West,
Central, East using the prefix’s w,c,e respectively for hex references.
• Each hex is 2 miles across.
• All movement will be by road unless
specifically ordered otherwise.
• The Danube can only be crossed at
bridges on major/minor roads or by pontoons built at designated briding points.
• Players will have to make
assumptions about movement based on movement rates shown in the Appendices.
• The Umpire will determine the
effect of terrain on all march orders and will relay information on march
progress as appropriate to the players.
There were three important factors the players needed to
keep in mind whilst issuing orders: Centre of Operations, Supply Centres and
the Victory Matrix. These were explained to them as follows:
CENTRE OF OPERATIONS
·
Each
player must designate his centre of operation (CoO). This is the position of
his GHQ
·
The CoO
determines the players effective control of his forces
·
The
control distance is 60 miles (30 hexes)
·
Formations
and units not within the CoO radius are not out of command. They can still be
given and receive orders. However their reaction time and compliance with the
orders will be effected as determined by the Umpire.
·
The CoO
can be moved, but whilst being moved, the players ability to send orders/react
to events will be limited as determined by the Umpire.
·
To move a
CoO, simply designate its new location. The Umpire will inform the player once
the CoO is fully functional again.
SUPPLY CENTRES
·
Each
player has 2 supply sources at the start of the campaign.
Austria
– Budweis c1101 and Wolkersdorff e1101
France
– Vorburg w0025 and Aichach w0027
·
At the
start of the campaigneach player must designate one as its current supply
source
·
The CoO
must have a clear line of supply to the designated supply source
·
The line
of supply cannot exceed 160 miles (80) hexes)
·
If a line
of supply cannot be traced either because enemy forces have cut the line or the
CoO has moved outside the line distance, then the army is considered to be out
of supply. As a consequence the Umpire will determine attrition and morale
losses for all units of the army until the line of supply is re-established.
The French player can
designate PASSAU w4721 as a new supply center once a French force has passed
through Passau and a clear line of supply can be drawn to either w0025 or w0027
THE VICTORY MATRIX
The
state of the Vienna Morale marker on the Victory matrix, is the sole
determinant of victory in the campaign.
 |
| Austrian troops march through a sleepy village. |
Critical battles
A
battle in which either side loses 25% or more of its brigades as broken is
termed a “critical battle”. Once the battle is concluded the winner subtracts
the number of his broken brigades from the number of the loser’s broken
brigades. If the difference is at least
2, the winner of the battle rolls 1D6. If the roll is less than the difference,
the Vienna morale marker is moved one point in favour of the winner.
Death of a Corps or Divisional Commander
At
the end of a battle in which a Corps or Divisional commander with any
“exceptional rating” is killed, roll 1D6 and add +1 per death to a maximum of
3. If the roll is 6 then the Vienna morale marker is moved 1 point in favour of
the opposing side.
Regensberg (w0815)
If
Regensberg falls to the Austrians the Vienna morale marker is moved 1 point in
favour of Austria. If Regensberg is subsequently recaptured by France, the
Vienna morale marker is moved 1 point in favour of the French.
Vienna (e0909/0910/1009)
The
first time in the campaign a French force of Divisional Strength moves within
14 miles (7 hexes) of Vienna, the Vienna morale marker is immediately moved 1
point in favour of the French.
In
the event that the above occurs, the Austrian army is immediately reinforced
with a brigade of 6 battalions of Vienna citizen militia under the command of
GM O’Reilly. This unit may never move more than 14 mile (7 hexes) from Vienna.
In
the event that a French force of any size enters one or other of the 3 Vienna city
hexes and no Austrian force occupies any of the 3 Vienna hexes, the Vienna
morale marker is immediately moved 1 point in favour of the French.
Hemau (w0016)
If
Archduke Charles together with a force of at least 3 Divisions exits the map at
Hemau, and the Vienna morale marker is +3 in favour of Austria, then Austria
automatically wins the campaign.
Other
than this, the campaign automatically ends if either side sues for peace, or
the campaign continues to the 11th July 1809.
Victory determination
Once
the campaign ends victory is determined as follows:
+4 in
favour of France is a Decisive French Victory
+3,
+2 or +1 in favour of France is a Marginal French Victory
+4 in
favour of Austria is a Decisive Austrian Victory
+3,
+2 or +1 is a Marginal Austrian Victory.
If the Vienna Morale
Marker is at 0 when the Campaign ends, the result is a draw.
 |
| Massive French columns plough on. |
As umpire I would keep track of all units, its strength,
movement and attrition. I would provide all reports based on troop movements,
reconnaissance and players orders. All the players had to do was issue orders
to their commanders.
The campaign set up was based as near as possible on the
historical positions of the armies in theatre as at 9th April 1809
which was my chosen start date. To ensure we got a battle within days, I took
the liberty of moving some units slightly, and brought forward the arrival in
theatre of some formations (mainly the French and Allies). One major deviation
from history was the weather. I decided not to start with the appalling weather
that the armies faced in 1809. Instead the weather was going to be dry. This
meant that troops would move to their maximum ability and would, I hoped,
result in an early battle for the table top. I provided the players with a
guide on how far their different troop types could march each day, but did not
tell them what could or would reduce those rates. Like their historical
counterparts they would find out as and when things happened.
A campaign turn was set at 2 days duration. Again the reason
for this was to speed up troop movements. Where necessary, as umpire, I would
break that down into daily or hourly moves as the situation on the map
required. However, as far as the players were concerned, once set in motion
their troops would march until ordered otherwise. At the end of each campaign
turn each player would receive a report, written by the Chief of Staff
summarising events for the Commanding General.
What I hope all this achieves, is to put the player in the
position of his historical counterpart, studying maps, considering reports and
issuing orders, leaving all the administration of his armies to the Chief of
Staff and Quartermasters.
With the above in place, it was over to the players to set
their strategies and write their orders. Russian Tony has the role of
Berthier/Napoleon and Chris the role of Archduke Charles. Jeremy and I would
play subordinate commanders as necessary.
The bulk of Chris’s Austrian Forces (III, IV, V, VI, I
Reserve and II Reserve Corps) start south of Passau along the line of the Inn
river. I and II Corps are to the north of Regensberg, marching to get in
theatre.
Tony’s French Allied forces are dispersed, with only the
Bavarian Royal Army and a few elements of Davout’s command in theatre. The rest
are burning boot leather to reach Regensberg.
The next instalment will describe the opening moves and the
first campaign battle at Passau.
 |
| Bavarian allies with skirmishers to the fore. |
 |
| Austrian Landwehr form square. |
 |
| The French deploy pontoons to cross a river. |
So that's it! The scene is set for some incredible encounters. The Passau game is done, next up the battle of Landshut, apparently a monster in the making, this demands another playtest of the General d'Armee rules, stay tuned boys & girls.
Jeremy
Jeremy
This looks awesome! Great work!
ReplyDeleteWhat a fascinating undertaking, very well written and described too. I look forward to following the campaign.
ReplyDeleteVive L'Emperor !
ReplyDeleteVery much looking forward to following this campaign.
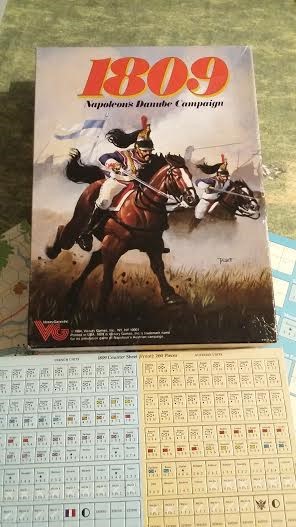
ReplyDeleteExcellent work, inspiring write up, and I'm looking forward to next report of a campaign that was historically very interesting and quite close at times. Also looking forward to seeing the guide book too. P.s. I have 1809 by VG and many other of Kevin Zucker's excellent games. His 1809 and other operational games are probably the best available for studying and playing as realistically as possible a Napoleonic Campaign.
ReplyDeleteGreat project. The 1809 campaign is my personal favorite.
ReplyDeleteExcellent, all done in superb style! I look forward to the campaign progress! :)
ReplyDeleteBrilliant stuff Tony, Jeremy and Marauders all. I'm with Peter (and Tony) in having 1809 as a fav. Difference is that he has done it, you are doing it, while for me its on the list, haha
ReplyDeleteJoining those looking forward to the battle reports to come. Will the Austrians be able to trap Davout this time? Will N's response be as swift and remarkable as phase 1 of the original campaign? So much to look forward to!
Indeed brilliant material! Very pleasing table to look at too! The 1809 campaign happened to be to me the most interesting one!
ReplyDeleteCheers,
Stan
http://stansarmee.blogspot.com/