We had to get them out so decided on our 20/20 format for one night games. Briefly each player picks a plausible force of 20 units split into sensible brigades. No points are used - we want unbalanced challenging games where the games enjoyment is the aim along with the look of the thing. Before the game starts we roll for commander ability and then apply 1d6 minus 3 casualties to all units; this kicks off the action like nothing else (except 1d6 casualties I s'pose!).
 |
| The inaugural game for Chris's Austrians. The north Italian foothills near Facile provide the setting for his clash with Eugene in 1809. |
 |
| Austrian deployment is to the left of the row white stones, the French to the right of the yellow tape measure. The objectives are control of the two bridges. |
 |
| Looking south west from the foothills where the Austrians deploy towards Facile and Pendoza in the distance. The tape measure and white stones indicate the extents of deployment. |
 |
| Viennese Landwehr advance enthusiastically into Italy, intent on some sun, sand & sacrifice. Chris's Victrix toys painted by Barry Hill, based by me & Chris with GMB flags. |
"Gentlemen we have a scenario, to your marks."
 |
| The irrepressible Hessen Homburg Hussars trot off to an appointment with victory & a place in the history books. Chris's new Foundry toys vividly painted by Tony Laughton with GMB flags, based by us. |
 |
| This dandy fellow displays all the traits of a Hussar officer much like his regiment - flamboyant over use of primary colours and acres of gold braid plus slightly dodgy black leather driving gloves.... Foundry toy for Chris by Tony Laughton. |
C-in-C Feldmarschall-Leutnant Nordmann
General Major Mayer
IR 4 Hoch und Deutschmeister 48 elite
IR 49 Kerpen 48 line
IR 2 Hiller 48 line
5th Vienna Landwher 32 2nd class
6th Vienna Landwher 32 2nd class
1st Landwher Chasseur Battalion 32 2nd class
Battery 4 x 12
Pounders
General Major Riese
IR 44 Bellegarde 48 line
IR 46 Chasteler 48 line
IR-58
Beaulieu 48 line
1st Vienna Landwher 32 2nd class
2nd Vienna Landwher 32 2nd class
3rd Vienna Landwher 32 2nd class
Battery 4 x 6 Pounders
General Major von Hammer
Scharlach’s Grenadiers 48 elite,
Scovaud’s Grenadiers 48 elite,
Mayblumel’s Grenadiers 48 elite,
Erzherzog Franz Cuirassiers 32 elite
General Major Wartensleben
EH Johann Dragoons 24 line,
Hessen-Homburg Hussars 24 line.
 |
| The real power of the Austrian army seems to be in the massive 48 strong infantry battalions like these two German & Hungarian battalions - real juggernauts. Note the oak leaves over the pompom on the shako. Chris's Victrix models painted by Barry Hill, GNB flags, based by us. |
 |
| Hungarian line infantry in their distinctive blue trousers with yellow cording, lovely bright colours with the yellow facings too. This pictures really shows how detailed the GMB flags are - superb prints and frankly a slightly fuzzy picture. Chris's Victrix models painted by Barry Hill based by us. You know about the flag. |
 |
| The gates of Pendoza - a PMC model from ebay with early GW heraldic shields from one of those village boxed sets they did back in the 80's before they turned. Products for Wargamers road - no idea on the plants - sorry! |
 |
| Chris photographs his new Army of Bohemia in action for the first time - bless. |
 |
| The Austrian Advance Guard in position at the start of proceedings. That's a lot of kit! |
 |
| A poor shot of my new Austrian Dragoons. These look very splendid and when a better shot turns up I'll post it along with the Doug Mason originals which inspired me to collect this Regiment. Elite Miniatures plus Front Rank standard bearer holding GMB flag. Painted by Tony Laughton for me - thanks Tony these are wonderful! Based by Chris after my instruction but introducing the "bunch of flowers" method to my troops for the first time - I like it! |
 |
| The Austrians can be seen en masse up in the hills and marching straight down the pass towards Facile with its all important bridge. The wine merchants have run back into the safety of the walls abandoning their valuable wine on the quayside - spineless goons. |
 |
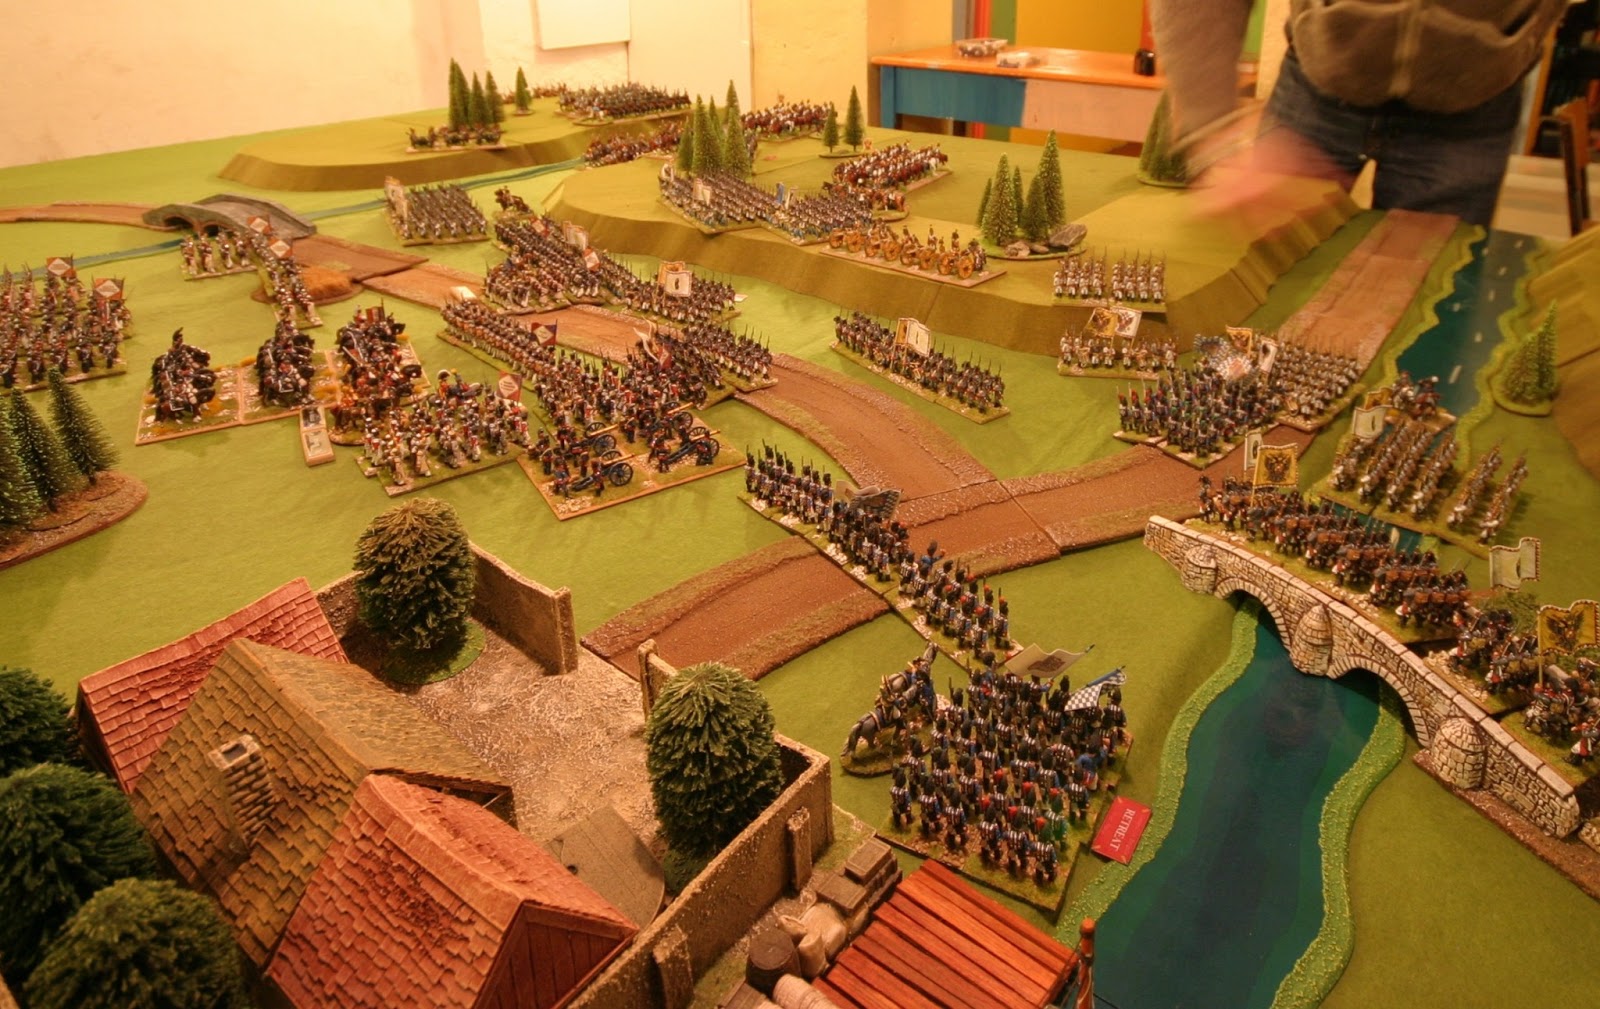
| Looking south from behind the the Austrian centre. Line regiments, Landwehr and a reserve of 3 Grenadier battalions with artillery support spill out onto the shallow foothills. Others are out of shot over the river to the east (left!) and more to the west (right). Those two bridges look so near yet so far away. They also look strangely thinly held from here. What a sight. Glorious. |
 |
| Looking south west from behind the right of the Austrian deployment. Here we see more Line and Landwehr supported by Cuirassier in the foreground.These are also Elite Miniatures painted by Tony Laughton & based by Chris for my collection. To the left Chris's Hessen Homberg Hussars supported by my Dragoons head off over the shallow stream bed to outflank my position. |
 |
| Looking north west at the Austrians again. This time we see the forward most Austrian units and battery (Prussians proxying). This battery sat up on the bluff bombarding the Bavarian position before limbering up and closing the range. Chris rightly claimed that the best way to take a bridge is "at both ends". |
C in C Prince Eugene
Brigade Ochs
3 x 36 Bavarian line
Brigade Tharreaux
3 x 36 Swiss (1 veteran, 1 line, 1 2nd class)
Brigade Friant
3 x 36 French (1 elite, 1 line, 1 x 2nd class)
Brigade Campans
4 x 36 French (1 elite, 1 line, 2 x 2nd class)
Brigade Pajol
2nd Lancers x 24
5th Hussars x 24
9th Hussars x 24
1 horse battery (veteran) 3 x 6lbs
Corps assets
2 x 4 gun 8lb foot batteries to be attached - one each to Ochs and Campans
1 x 24 Cuirassiers (elite) General attached
 |
| A different angle showing the Austrian extreme left with their foot battery deployed on the bluff along with both Line and Landwehr battalions lining up to take my bridge. The filthy swine! |
 |
| This is the right of the French position resting on Facile. Here Och's Bavarian Brigade is holding Facile. His orders are to sally out, assault and hold the bridge which in tantalisingly close. To the left of Facile is the Swiss Brigade under Tharreaux with orders to support Ochs. Eugene and his staff are to the left looking lonely in the open. |
 |
| This is the centre and centre left of the French position. Campans holds the bridge with his strong brigade, 4 battalions & a battery. Behind him is Friant with three more battalions on support orders. You will have noticed the Cuirassiers at rest; these are the 12th under St Germaine, they are in reserve on Hold orders. |
 |
| As well as being a good shot of the walled town of Pendoza this also shows the French extreme left. In the distance Pajols light cavalry brigade is tearing off over the hills with orders to assault the Austrian assembly area on its western flank. This is a powerful formation which was rendered largely useless in the face of the dreaded Hessen Homberg Hussars. |
 |
| The mighty Hessen Homburg Hussars meet and defeat the French 9th Hussars in the Pendoza stream. The first round was a draw, both sides failed to reinforce, then the Austrians won big, chased on into the rest of the brigade and defeated all comers! The supporting Austrian dragoons never even had to fight! |
Note the rather smart labels for the generals in some photos. These are engraved with the General's name by Tony and glued to magnetised bevelled bases from Renaissance Ink via Veni Vidi Vici in Preston (possibly fallen out with each now?). Tony produced loads of these for our Borodino games and has tons of blanks for further armies, Prussian, French, Austrian and British if he can be persuaded.
 |
| The Austrian centre spreads out to attack the two bridges and make room to deploy the artillery. Cuirassiers and Grenadiers move to support. |
 |
| The Austrian centre with Ochs lead battalions spilling out of Facile to attack the bridge. Grenadiers move to support the centre. |
 |
| The desperate struggle for the Facile bridge commences as Bavarian columes sally out to meet the Austrian threat. Splendid flags all round gents! Let battle commence. |
 |
| View from behind the French centre; Tharreaux has strung out his Swiss between Ochs and Campans to strengthen the line and St. Germaine has moved forward in accordance with his new orders. Friant remains in reserve supporting Campans. |
 |
| The 9th Hussars have retreated to reform leaving the Austrian in the stream. Better send the Lancers in to be sure. |
 |
| Same scene as above with a little more of the battle line shown. |
 |
| Different angle on the same scene with Campans firmly holding the Pendoza bridge in the background. |
 |
| With no one in command Ochs' brigade bravely holds on in the face of rapidly escalating pressure. Chris finally deploys his Austrian 12lb battery on the heights . |
 |
| A couple of turns later... The Austrians have descended the escarpment and run down Campans battery with two battaions. A third battalion was shot to bits by the 36 strong Legere in line as it attempted to shake out into line itself. On the left note that the 9th Hussars have chased off a unit Landwehr while the horse battery are enfilading the Austrians. |
 |
| The Bavarian brigade now has a new leader and are stiffened at the prospect. The lead battalion is charging off but gets stuck and is about to flanked on both sides. |
 |
| The bloody Hessen Homburg Hussars charge the 5th Hussars - predictably they win. They have now beaten all three regiments under Pajol, one of them twice. What happened to the new unit rule which quite clearly states they lose badly? |
 |
| Veteran horse artillery enfilade those massive Austrian columes - too little too late. |
 |
| The French position looks strong but it isn't - much of this is 2nd class stuff and the best stuff is battered. |
 |
| Good shot of the closing stages. Great to see proper lines giving the battle the structure you see in those maps of the age. |
 |
| Same scene - roughly. The Bavarians are broken now; Facile lines open and the bridge is in Austrian hands. Even Campans elite legere are retreating, woe is me, alack! |
 |
| The vie from Facile at the end. |
 |
| Hmm....I don't seem to have taken many casualties at all. |
Lovely table, troops, and an excel;lent report!
ReplyDeleteSo an evenings game in Bath consists of what appears to be a 6ft x 12ft table and about 700 figures a side - Mental!
ReplyDeleteI love it.
Scrivs
That just about sums it up Scrivs - mental!
DeleteYou don't do too badly yourself though old chap.
have fun,
Jeremy
Huge batallions and 24x Cavalry units look great!
ReplyDeleteFantastic battle report! Love the history and background, and the battlefield and quality of figures is truly outstanding...
ReplyDeleteHi Brian, you're too kind - thanks a lot. Hope your games are shaping up too. Building up the kit is half the battle in this period! Glad you liked it, best wishes,
DeleteJJ
Great looking game and excellent looking troops. Thanks for posting..
ReplyDeleteBrilliant JJ,
ReplyDeleteA really inspiring post. My buddy is just about to start painting Austrian hussars so ill send him along to check out your dandy!
Cool! We played again tonight - Austrians v French in the next part of the narrative Tyrolean campaign. I'll post soon. We also did French v Brits and French v Russians. All should appear soon enough.
DeleteBe good,
JJ
Just a night out pushing toys about. I love my new Austrians, some performed poorly but the H&H Hussars were immense very near 50% casualties at the end though...
ReplyDeleteChris
Glad you all enjoyed it and thanks for the generous feedback. We had a lot of fun preparing this, setting it up and then playing it. Writing these reports up and editing piccies is more like hard work and very time consuming but you guys make it worthwhile - thanks.
ReplyDeleteVery best wishes,
JJ
Now that is what I call a Napoleonic's game... superb....
ReplyDeleteI hoped you'd say that! That's exactly what we're aiming for. Glad it met with your approval.
DeleteBest wishes, jj
Great report and fantastic looking battle!
ReplyDeleteFantastic! Your table is impressive, the gates of Pendoza wonderful and Austrian figures fabulous...great work, and a very nice blog too...I'll soon come back !
ReplyDeletePhil.